|
Recent Entries to this Blog
Photinia Red Robin characteristics and most important care
Posted: 29 May 2023 Posted: 03 May 2023 Posted: 22 Apr 2023 Posted: 11 Apr 2023 Posted: 01 Apr 2023 All Entries |
AlbertoL's Blog
Photinia Red Robin characteristics and most important care
Category: plants | Posted: Mon May 29, 2023 10:20 pm One of the shrubs that can give your garden the most color without a doubt is the Photinia Red Robin. It is very easy to care for and will create one of the most beautiful red patterns around. In this article we will analyze various aspects of this particular shrub, stay until the end and you will surely want to have one in your garden. 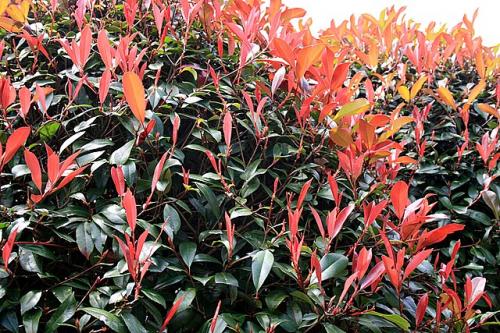
Photinia red robin ( photo / image / picture from AlbertoL's Garden ) Although this ornamental shrub originates from the United Kingdom, its cultivation has now spread to gardens around the world. One place where it is very popular is in New Zealand, especially in Auckland gardens. Photinia Red Robin Auckland has become a beloved feature in city landscapes. Its distinctive beauty adds a touch of elegance to residential gardens, parks, and public spaces. 1. What is the Photinia Red Robin? The Photinia red robin is a shrub that is characterized by having leaves that, instead of being completely green, are maroon tones. In fact, only when the leaves are ripe are they green, meanwhile, that is, while they are growing, they are red and attract a lot of attention. It has a slow growth, and training pruning is important for it to take shape. It does not have a considerable height (no more than 1.5 meters), so it is used as a shrub for gardens and parks or to create small fences with them. Of course, it can also be kept in a pot and many are encouraged to create fun shapes with this plant. As for the stem, if you look at some images of this shrub you will see that it is red, and as it matures it also changes color as in the case of the leaves. In the spring season it blooms with small white flowers with a yellow center. Normally from May, the flowers will give way to the fruits, which will ripen in summer and will be blue. It is not edible for humans, although you may see birds feeding on it. 2. The nine virtues of the Photinia Red Robin There are many good reasons why you won't regret having a Red Robin photinia or a whole hedge formed with them: 1. It roots easily, especially if you apply a slow release fertilizer rich in phosphorus, at the bottom of the hole where you are going to plant it. 2. It grows very fast, up to 1 m per year, or more if conditions are favourable. 3. It tolerates pruning very well with a great regrowth capacity, even favoring it by making its color more vivid. 4. Due to its large evergreen leaves, it is well suited for making screen hedges for privacy. In addition, with pruning its density increases to make it more bushy. 5. It is very ornamental due to the color of its large, shiny leaves, so it also looks great as an isolated shrub. 6. It can be grown in a pot or in a container, better if you choose a dwarf variety. 7. It is tolerant of any type of soil, although it vegetates worse on limestone. It can thrive in poor soil, but it will flourish much more if it is fertile or if you fertilize it regularly. 8. It is a very rustic plant, supporting strong frosts down to -15 ºC. 9. It suffers few pests and diseases, although some can affect it. 3. Photinia Red Robin care to avoid problems If you are already determined to cultivate your Photinia Red Robin, I give you a list of tips so that you always look your best. - Climate: Prefers temperate climates without very high temperatures. Withstands frosts up to -15 ºC. - Soil: It thrives in all types of soils that are not very limestone, but better in loose and fertile soils. - Exposure: If you live in an area with very hot summers, plant it best in partial shade. If not, in full sun so that its colors are more intense. - Irrigation: It is enough to water it moderately 2 to 3 times a week in the hot season. The rest of the year - only occasionally so that the soil does not dry out completely. - Fertilizer: It will appreciate if you provide some mineral organic fertilizer, better once a month. - Pests: It is little affected by pests but it can be attacked by the false caterpillar of the rose bush, which causes holes in its leaves. - Pruning: it needs maintenance pruning throughout the year, and more drastic pruning in winter. Keep in mind that these are general care, they may undergo some changes due to aspects such as their geographical location or special characteristics of the plant. Therefore, use our recommendations as a general guide, then your experience or the advice of experts in the area can help you carry out more specific care. This blog entry has been viewed 1979 times
Tree Surgeon vs. Arborist: What's the Difference?
Category: plants | Posted: Wed May 03, 2023 9:08 pm When it comes to caring for your trees, you may have heard the terms "tree surgeon" and "arborist" used interchangeably. However, while the two professions share some similarities, they are not the same. 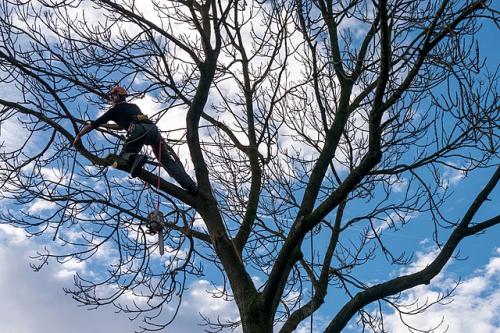
( photo / image / picture from AlbertoL's Garden ) In this article, we'll explore the key differences between tree surgeons and arborists, including their education and certification requirements, the services they provide, the tools and equipment they use, their safety standards, cost differences, and how to choose. . the right professional for your needs. Whether you live in England and need a tree surgeon in Nottingham, or are an American looking for an arborist in Phoenix, this post will come in handy. ;) I. Education and Certification Both tree surgeons and arborists require a certain level of education and training to be qualified for their respective professions. Tree surgeons typically complete a vocational or technical school program in tree care, which covers topics such as tree identification, pruning, tree removal, and pest management. They may also complete on-the-job training with an experienced tree care professional. In terms of certification and licensing, requirements can vary depending on the state or country. In the United States, for example, some states require tree surgeons to be licensed and certified by a professional organization such as the International Society of Arboriculture (ISA). Arborists, on the other hand, typically have more extensive education and training requirements. Most arborists have a bachelor's degree in forestry, horticulture, or a related field, and many hold a certification from a professional organization such as the ISA. These certifications require passing a comprehensive exam and demonstrating a certain level of experience and knowledge in the field. It's important to note that hiring a certified professional is important, as it ensures that the individual has the necessary skills and knowledge to safely and effectively care for your trees. II. Services Provided Both tree surgeons and arborists provide a range of services related to tree care, but the types of services offered can differ between the two professions. Tree surgeons typically focus on the physical care of trees, such as pruning, trimming, and removal. They may also offer services such as stump grinding, cabling and bracing, and pest management. Arborists, on the other hand, take a more holistic approach to tree care. They not only provide physical care for trees but also offer services such as tree planting, tree preservation, and consulting on tree-related issues. Arborists may also be involved in urban forestry and land management. III. Tools and Equipment Both tree surgeons and arborists use a range of tools to carry out their work. However, the tools used may vary depending on the type of work that needs to be done. Some of the common tools used by both professionals include: ⢠Chainsaws: These are a crucial tool for both tree surgeons and arborists. They are used for cutting branches, limbs, and even entire trees. ⢠Climbing equipment: Both tree surgeons and arborists need to climb trees to carry out their work. They use climbing harnesses, ropes, and ladders to climb trees safely. ⢠Pruning tools: Pruning is an important aspect of tree care, and both tree surgeons and arborists use a range of pruning tools, including pruning saws, secateurs, and loppers. ⢠Wood chippers: After a tree has been cut down or pruned, the branches and other debris need to be disposed of. Wood chippers are used to turn the debris into wood chips, which can be used for various purposes. ⢠Stump grinders: When a tree has been cut down, the stump needs to be removed. Stump grinders are used to grind the stump into small pieces, which can then be used as mulch or removed altogether. ⢠Soil aeration tools: Arborists may use soil aeration tools to improve the health of trees by improving the soil quality and allowing oxygen to reach the roots. ⢠Diagnostic tools: Arborists use diagnostic tools, such as microscopes and sap tests, to determine the health of trees and identify any diseases or pests that may be present. It's worth noting that while both tree surgeons and arborists use similar tools, they may use them in different ways. For example, an arborist may use a pruning saw to remove dead or diseased branches, while a tree surgeon may use a chainsaw to remove entire limbs or trees. In addition to the tools used, there are some other key differences between tree surgeons and arborists. Let's explore some of these differences in more detail. This blog entry has been viewed 526 times
Comments (0) | Leave a Comment | Permalink
What are the special care you should have with a fruit tree?
Category: plants | Posted: Sat Apr 22, 2023 1:31 pm Fruit trees are an essential part of agriculture and play a vital role in providing us with fresh and healthy produce. However, growing fruit trees requires special care to ensure they thrive and produce a bountiful harvest. In this article, we'll explore the various aspects of fruit tree care, from site selection and planting to watering, pruning, fertilizing, and pest control. 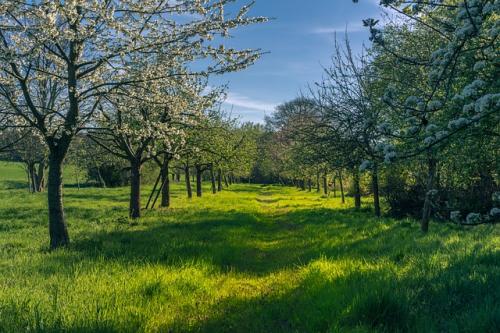
Fruit trees ( photo / image / picture from AlbertoL's Garden ) Although after reading this post you will not come out as an expert knowing how to grow fruit tree, at least you can be sure that you will not make serious mistakes. Then each fruit tree specifically needs special care, so you should inform yourself in more detail in order to be a specialist on the subject. ;) 1. Site Selection Choosing the right location is crucial for the success of a fruit tree. When selecting a site, it's important to consider several factors such as soil type, drainage, sunlight, and wind exposure. Fruit trees prefer well-draining soil with a pH of 6.0 to 6.5. If the soil is too acidic or alkaline, it can affect the tree's growth and production. The site should also receive plenty of sunlight, preferably 6 to 8 hours of direct sunlight a day. The exposure to wind is also important, as strong winds can damage the tree and its fruits. Therefore, it's recommended to plant fruit trees in a sheltered area. 2. Planting Choosing the right type of fruit tree is crucial for its growth and production. Consider the climate and growing conditions in your area to select the appropriate species or cultivar. It's also essential to choose a healthy tree from a reputable nursery. The best time for planting fruit trees is in the dormant season, which is typically in late winter or early spring. This allows the tree to establish its root system before the onset of hot weather. When planting the tree, it's important to dig a hole that is twice as wide and deep as the tree's root ball. Add compost or organic matter to the soil to improve its fertility and moisture-retaining capacity. After planting, water the tree thoroughly and mulch around the base to retain moisture and prevent weed growth. 3. Watering Proper watering is essential for the growth and health of fruit trees. During the growing season, fruit trees need about 1 to 2 inches of water per week. However, the exact amount depends on the species, age, and growing conditions. To water the tree, apply water slowly and deeply to the root zone. Avoid watering the foliage as this can increase the risk of diseases. It's also essential to monitor the soil moisture level and adjust the watering frequency as needed. Overwatering can lead to root rot, while underwatering can cause stress and reduce fruit production. 4. Pruning To learn to know how to grow trees that bears fruits, it is essential to be clear about a concept such as pruning.Pruning is necessary to maintain the shape and size of the tree, promote fruit production, and remove damaged or diseased branches. The best time to prune fruit trees is during the dormant season, which is typically in late winter or early spring. When pruning, start by removing any dead, damaged, or diseased branches. Then, thin out the tree by removing any crossing or rubbing branches. Finally, prune to shape the tree according to your desired form. It's important to use clean, sharp tools to avoid damaging the tree and spreading diseases. After pruning, sterilize the tools with rubbing alcohol or a bleach solution to prevent the spread of diseases. 5. Fertilization Fruit trees require proper fertilization to ensure healthy growth and fruit production. The type and amount of fertilizer depend on the species, age, and soil fertility. Organic fertilizers like compost, manure, and bone meal are excellent sources of nutrients for fruit trees. Inorganic fertilizers like nitrogen, phosphorus, and potassium can also be used in moderation. It's important to fertilize fruit trees at the right time and rate. Generally, fertilizers should be applied in the early spring 6. Pest Control One of the biggest challenges in growing fruit trees is dealing with pests and diseases. Pests like aphids, mites, and scales can damage the tree and reduce fruit production. Diseases like fungal infections can also affect the tree's growth and health. To control pests, it's important to monitor the tree regularly and take action as soon as signs of infestation appear. This can include spraying the tree with insecticidal soap or oil, using pheromone traps, or introducing natural predators like ladybugs. For fungal infections, it's important to prevent moisture buildup by spacing the trees properly, improving airflow, and avoiding overhead watering. Fungicides can also be used to prevent and treat fungal diseases. 7. Harvesting Harvesting is the most rewarding part of growing fruit trees. The time of harvest depends on the species and cultivar, as well as the climate and growing conditions. Most fruits are harvested when they are ripe and have reached their full color and flavor. Some fruits like apples and pears can be harvested when they are still slightly underripe and allowed to ripen off the tree. It's important to handle the fruits gently and avoid bruising or damaging them. Store the fruits in a cool, dry place and consume them within a few days or preserve them for longer storage. Conclusion Growing fruit trees requires special care and attention, but the rewards are well worth the effort. By selecting the right site, planting a healthy tree, providing proper watering and fertilization, pruning, and controlling pests and diseases, you can enjoy a bountiful harvest of fresh and healthy fruits. Remember to always monitor your tree's growth and health and take action as needed to ensure its success. With these tips and techniques, you'll be well on your way to growing healthy and productive fruit trees that will provide you with delicious fruits for years to come." In conclusion, growing fruit trees requires special care and attention, but the rewards are well worth the effort. By selecting the right site, planting a healthy tree, providing proper watering and fertilization, pruning, controlling pests and diseases, and harvesting at the right time, you can enjoy a bountiful harvest of fresh and healthy fruits. Whether you're a seasoned gardener or a beginner, it's important to understand the needs of fruit trees and take the necessary steps to ensure their growth and productivity. Remember to monitor your tree regularly, make adjustments as needed, and seek help from a professional if necessary. With these tips and techniques, you'll be well on your way to growing healthy and productive fruit trees that will provide you with delicious fruits for years to come. Last edited: Sat Apr 22, 2023 1:32 pm This blog entry has been viewed 409 times
Comments (0) | Leave a Comment | Permalink
How to Make the Perfect Indoor Hydroponic Garden
Category: plants | Posted: Tue Apr 11, 2023 10:48 pm Indoor hydroponic gardening is an exciting and innovative way of growing plants without soil. The beauty of this method is that you can grow anything you want, anywhere you want, all year round. Whether you want to grow herbs for your kitchen or vegetables for your salads, indoor hydroponic gardening is an excellent way to achieve that. In this article, we'll take you through the steps of creating the perfect indoor hydroponic garden. We'll cover everything from choosing the right plants to harvesting them. So, let's get started! 
Vertplanter pot ( photo / image / picture from AlbertoL's Garden ) A simple way to have your own hydroponic garden is with Vertplanter, a pot specially created for this type of crop. Take a moment to visit their website, then you can continue reading the post. ;) 1. Choose the Right Plants The first step in creating the perfect indoor hydroponic garden is choosing the right plants. Some plants are better suited for hydroponic gardening than others. Generally, plants that grow quickly and have shallow root systems are ideal for hydroponic gardening. Here are some examples of plants that are perfect for hydroponic gardening: ⢠Leafy Greens: lettuce, kale, spinach, arugula, etc. ⢠Herbs: basil, parsley, mint, cilantro, etc. ⢠Fruits: strawberries, tomatoes, cucumbers, etc. 2. Choose the Right System Once you have chosen the plants you want to grow, the next step is to choose the right hydroponic system. There are several different types of hydroponic systems, each with its own advantages and disadvantages. Here are some of the most popular hydroponic systems: ⢠Deep Water Culture (DWC) ⢠Drip Irrigation ⢠Nutrient Film Technique (NFT) ⢠Ebb and Flow (Flood and Drain) ⢠Aeroponics 3. Choose the Right Medium The medium you use in your hydroponic system is just as important as the plants and system you choose. The medium is what your plants will grow in and what will hold the nutrients they need to thrive. Some of the most popular hydroponic mediums include: ⢠Rockwool ⢠Coconut Coir ⢠Perlite ⢠Vermiculite ⢠Clay Pebbles 4. Choose the Right Nutrients Nutrients are an essential part of hydroponic gardening. They provide your plants with the necessary elements they need to grow and thrive. There are two types of nutrients that your plants need: macronutrients and micronutrients. Macronutrients are the elements that your plants need in large quantities, such as nitrogen, phosphorus, and potassium. Micronutrients are the elements that your plants need in small quantities, such as iron, zinc, and copper. 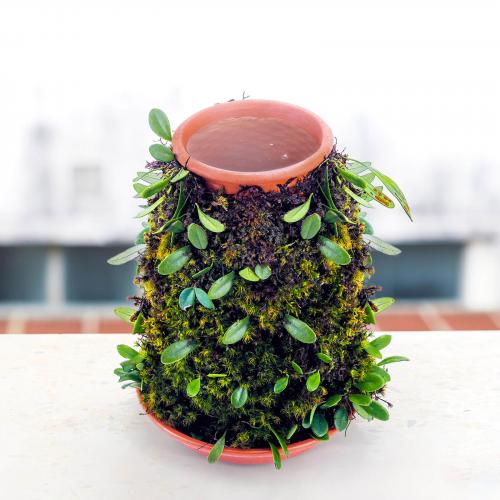
Vertplanter pot ( photo / image / picture from AlbertoL's Garden ) 5. Choose the Right Lighting Lighting is crucial in hydroponic gardening because your plants won't have access to natural sunlight. Instead, you'll need to provide them with artificial light. The type of lighting you choose will depend on the plants you're growing and the hydroponic system you're using. Some popular lighting options for hydroponic gardening include: ⢠LED Grow Lights ⢠High-Pressure Sodium (HPS) Lights ⢠Metal Halide (MH) Lights 6. Choose the Right Temperature and Humidity Temperature and humidity are two essential factors that affect the growth of your plants. Most plants prefer temperatures between 65-75 degrees Fahrenheit and humidity levels between 50-70%. It's essential to monitor and maintain the temperature and humidity levels in your hydroponic garden to ensure your plants grow properly. 7. Maintaining Your Hydroponic Garden Once you've set up your hydroponic garden, it's important to maintain it properly. Here are some tips for maintaining your hydroponic garden: ⢠Monitor pH Levels: pH levels are crucial for the growth of your plants. It's essential to monitor and adjust the pH levels in your hydro ponic system regularly. The ideal pH level for hydroponic gardening is between 5.5 and 6.5. You can use a pH testing kit to check the pH levels of your water and adjust it accordingly. ⢠Monitor Nutrient Levels: Just like pH levels, nutrient levels are also crucial for the growth of your plants. You should regularly check the nutrient levels in your hydroponic system and adjust them accordingly. You can use a nutrient testing kit to check the nutrient levels in your water and adjust it according to the needs of your plants. 8. Prune Your Plants Pruning is an essential part of hydroponic gardening. It involves removing any dead or damaged leaves, stems, or roots from your plants. Pruning helps to improve the overall health and growth of your plants. 9. Harvest Your Plants Harvesting your plants at the right time is crucial for getting the best yield. Make sure to harvest your plants when they are fully mature. You can use a harvesting tool to remove your plants from your hydroponic system. 10. Clean Your Hydroponic System Regularly cleaning your hydroponic system is important to prevent the buildup of algae and other harmful bacteria. You should clean your system at least once a month using a mild soap or bleach solution. Conclusion Indoor hydroponic gardening is a fantastic way to grow your own herbs, vegetables, and fruits all year round. By following the steps outlined in this article, you can create the perfect indoor hydroponic garden. Remember to choose the right plants, system, medium, nutrients, lighting, and temperature and humidity levels. Additionally, make sure to maintain your hydroponic garden properly by monitoring pH and nutrient levels, pruning your plants, and cleaning your system regularly. With a little bit of effort and patience, you can enjoy a bountiful harvest of fresh, healthy produce from your indoor hydroponic garden. Last edited: Mon Apr 17, 2023 7:21 pm This blog entry has been viewed 409 times
Comments (0) | Leave a Comment | Permalink
The best deer resistant plants for you garden
Category: plants | Posted: Sat Apr 01, 2023 1:47 pm Creating a beautiful garden is a joy for many people, but when deer start to browse on your plants, it can quickly turn into a frustrating and expensive problem. Deer are common visitors to gardens, and they can cause significant damage to trees, shrubs, and flowers. However, there are many plants that are resistant to deer browsing and can help you maintain a beautiful garden without worrying about deer damage. 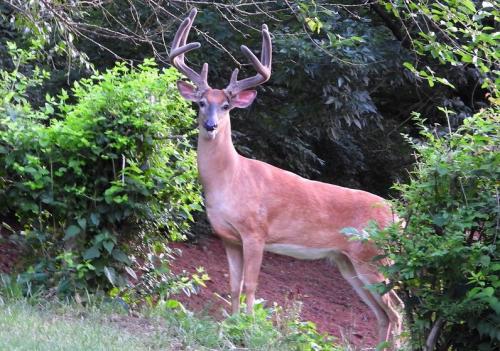
Deer garden ( photo / image / picture from AlbertoL's Garden ) In this article, we will explore the best deer-resistant plants for your garden, including their characteristics and the reasons why they are resistant to deer. By choosing these plants, you can create a beautiful and low-maintenance garden that is less attractive to deer. 1. The problem with deer in the garden Deer can cause a lot of damage to your garden. They are especially problematic in the spring when they are looking for food after a long winter. Deer will eat a wide range of plants, including flowers, vegetables, shrubs, and trees. They can cause damage by nibbling on leaves and flowers, stripping bark from trees, and rubbing their antlers against tree trunks. Deer browsing can also introduce diseases and pests to your garden. For example, deer ticks can carry Lyme disease, which can be transmitted to humans through tick bites. Additionally, deer browsing can stress plants and make them more vulnerable to other pests and diseases. Given all these problems, it is essential to know about deer resistant plants. 2. The best deer resistant plants for you garden To prevent deer damage in your garden, it is important to choose plants that are resistant to deer browsing. These plants have evolved to have characteristics that make them less attractive to deer, such as thorny leaves, strong scents, or bitter tastes. Here are ten of the best deer-resistant plants for your garden: 1. Lavender: Lavender is a fragrant and beautiful herb that is resistant to deer browsing. The strong scent of lavender can help mask the scent of other plants that deer find attractive. Lavender prefers well-drained soil and full sun. 2. Salvia: Salvia is a hardy perennial that produces beautiful, colorful flowers. It is resistant to deer browsing because of its strong scent and bitter taste. Salvia prefers full sun and well-drained soil. 3. Yarrow: Yarrow is a tough, drought-tolerant plant that is resistant to deer browsing. Its feathery leaves and clusters of tiny flowers are attractive to butterflies and bees. Yarrow prefers full sun and well-drained soil. 4. Daffodils: Daffodils are a classic spring flower that is resistant to deer browsing. They produce bright, cheerful flowers and are available in a wide range of colors. Daffodils prefer well-drained soil and full sun. 5. Foxglove: Foxglove is a tall, showy plant that produces spikes of bell-shaped flowers. It is resistant to deer browsing because of its bitter taste. Foxglove prefers partial shade and well-drained soil. 6. Russian Sage: Russian sage is a hardy perennial that produces beautiful, silver-gray foliage and tall spikes of lavender-blue flowers. It is resistant to deer browsing because of its strong scent. Russian sage prefers full sun and well-drained soil. 7. Iris: Irises are a classic garden plant that is resistant to deer browsing. They produce large, showy flowers in a wide range of colors. Irises prefer well-drained soil and full sun. 8. Butterfly Bush: Butterfly bush is a popular shrub that produces fragrant, colorful flowers that attract butterflies and hummingbirds. It is resistant to deer browsing because of its strong scent. Butterfly bush prefers full sun and well-drained soil. 9. Catmint: Catmint is a tough, drought-tolerant plant that is resistant to deer browsing. Its fragrant leaves and spikes of lavender-blue flowers are attractive to bees and butterflies. 10. Boxwood: Boxwood is a versatile shrub that is resistant to deer browsing. It produces dense, evergreen foliage that is easy to shape and prune. Boxwood prefers partial shade and well-drained soil. By incorporating these ten plants into your garden, you can create a beautiful and low-maintenance landscape that is resistant to deer browsing. Additionally, many of these plants are also attractive to pollinators, such as bees and butterflies, making them a great choice for eco-friendly gardening. 3. How To Keep Deer Out of Your Yard While planting deer-resistant plants is a great first step in preventing deer damage in your garden, it may not be enough. There are several other methods you can use to keep deer out of your yard and away from your plants. Here are some effective ways to deter deer: 1. Install a fence: One of the most effective ways to keep deer out of your yard is to install a fence. A fence that is at least 8 feet tall can prevent deer from jumping over it. However, if you do not want to install a fence or it is not practical for your property, there are other methods to try. 2. Use deer repellents: There are many deer repellents available on the market, including sprays, granules, and electronic devices. These products work by emitting a scent or sound that is unpleasant to deer, causing them to avoid the area. Be sure to follow the instructions carefully when using these products. 3. Plant deer-deterring herbs: Deer are deterred by the strong scents of certain herbs, such as lavender, rosemary, and thyme. Planting these herbs around your garden can help keep deer away. 4. Add physical barriers: You can also add physical barriers around your plants, such as netting or cages, to prevent deer from reaching them. 5. Use motion-activated devices: Motion-activated devices, such as sprinklers and lights, can startle deer and make them think twice about entering your yard. In conclusion, planting deer-resistant plants is a great first step in preventing deer damage in your garden. However, if you want to ensure that your garden remains deer-free, it is important to use a combination of methods, such as installing a fence, using repellents, planting deer-deterring herbs, adding physical barriers, and using motion-activated devices. By using these methods, you can enjoy a beautiful and thriving garden without worrying about deer damage. This blog entry has been viewed 339 times
Comments (0) | Leave a Comment | Permalink
How to correctly select plants for my garden
Category: plants | Posted: Tue Mar 21, 2023 11:15 pm Creating a beautiful and healthy garden involves selecting the right plants for your space. With so many options available, it can be overwhelming to decide which plants to include in your garden. Here are seven key steps to help you select the plants that will thrive in your garden and promote biodiversity. 
Garden plants - Get this image on: PxHere ( photo / image / picture from AlbertoL's Garden ) 1. Evaluate your garden space Before selecting plants, it is important to evaluate your garden space. Consider the amount of sunlight, water, and type of soil. Determine which areas get the most and least sun and where there may be drainage problems. It is also important to consider the size of your yard. If your space is small, you may want to choose more compact plants. If you have a larger space, you can select larger, sprawling plants. Take the time to measure your garden space and make sure you select plants that will fit properly. 2. Determine your garden goals Decide what you want to achieve with your garden. Want to attract pollinators, create a vegetable garden, or showcase a particular style? Knowing your goals will help you select plants that align with your vision. It is also important to consider the climate in your area and select plants that are suitable for the local climate. Some plants may be more resistant to drought, while others may require more water. Be sure to select plants that are suitable for the climate in your area. 3. Research the types of plants Research the different types of plants that are suitable for your garden space and goals. Consider the plant's size, growth rate, and maintenance requirements. It is also important to consider the seasonality of the plants and select a mix of plants that flower at different times of the year. Investigate the Araucaria an interesting and unique plant that can add a touch of elegance to any garden. The Araucaria is a genus of trees and shrubs commonly found in the southern hemisphere. It is a slow growing plant that can reach up to 80 feet in height. 4. Evaluation of seasonal change When selecting plants for your garden, it's important to consider how different seasons of the year may affect them. Some plants can thrive in the spring and summer, while others can better tolerate cold winter conditions. Therefore, it is important to consider the climate and the hardiness zone of the plants you are selecting. If you live in an area with different seasons, consider plants that bloom in the spring, summer, fall, and winter. Select plants that flower in different seasons of the year to keep your garden looking attractive at all times of the year. Also, consider the color and texture of the plants' leaves, as some may lose their foliage in winter while others maintain their foliage year-round. If you live in a hot climate, you can select plants that are drought resistant and can withstand high temperatures. If you live in a cold climate, it is important to select plants that can withstand frost and snowfall. You may also want to consider plants that are native to your area, as they are often more resilient to local weather conditions. 5. Consider biodiversity Promoting biodiversity in your garden is important for a healthy ecosystem. Choose a variety of plants, including native species, to provide food and shelter for different animals and insects. Native plants are also more resistant to diseases and pests. Also, incorporating different textures, colors, and heights will create visual interest in your garden. Flowering plants can attract pollinators, while plants with dense foliage can provide shelter for small animals. 6. Consider plant interaction It is important to consider how different plants interact with each other. Some plants can compete for water and nutrients, while others can complement each other. Consider how different plants may interact and select plants that benefit each other. It is also important to consider how plants affect the animals and insects in your garden. Some plants may be toxic to certain animals, while others may attract certain insects that may be beneficial to your garden. 7. Select healthy plants When selecting plants, be sure to choose plants that are healthy and free from diseases and pests. Inspect plants in the nursery for yellowing leaves, spots, or signs of pest damage. It's also important to choose plants that are appropriate for the size of your container or pot. In short, selecting the right plants for your garden is key to creating a healthy and beautiful space. Evaluate your garden space, determine your goals, research plant types, promote biodiversity, assess seasonal changes, consider plant interaction, and select healthy plants. By following these seven steps, you can create a garden that flourishes and promotes biodiversity in your community. This blog entry has been viewed 312 times
Comments (0) | Leave a Comment | Permalink
Wandering Jew - Everything you need to know about this plant
Category: plants | Posted: Mon Mar 20, 2023 9:22 pm The Wandering Jew, also known as Tradescantia zebrina or Zebrina pendula, is a popular houseplant native to Mexico, Central, and South America. It belongs to the Commelinaceae family and is a member of the Tradescantia genus, which includes several other species of wandering plants. 1. Taxonomy The Wandering Jew plant is scientifically known as Tradescantia zebrina or Zebrina pendula. It was first discovered by the botanist John Tradescant the Younger in the 17th century and later named in his honor. 2. Origin The Wandering Jew plant is native to Mexico, Central, and South America. It grows naturally in tropical forests and can be found in shaded areas with moist soil. 3. Form of Cultivation The Wandering Jew is a relatively easy plant to grow and care for, making it a popular choice among indoor gardeners. It can be grown in a variety of conditions, including low light, bright light, and indirect light. It is also fairly tolerant of temperature changes and can grow well in both warm and cool environments. To grow a Wandering Jew plant, start by selecting a well-draining potting soil and a pot with drainage holes. Place the plant in bright, indirect sunlight and water it regularly, keeping the soil consistently moist but not waterlogged. The plant can also be propagated easily by stem cuttings. 4. Uses The Wandering Jew plant is primarily used as an ornamental houseplant, appreciated for its unique foliage and ease of care. Its striking green and purple leaves can add a pop of color to any indoor space, and it can be grown in hanging baskets or as a trailing plant. Additionally, some people use the leaves of the plant for medicinal purposes, such as treating insect bites and skin irritations. 5. Care To keep a Wandering Jew plant healthy, it is important to provide it with the right conditions. Here are some key care tips: 5.1 Light The Wandering Jew plant prefers bright, indirect sunlight. It can tolerate low light, but may not grow as vigorously. Direct sunlight can cause the leaves to scorch, so it's best to avoid placing the plant in direct sunlight. If you notice that your plant is not getting enough light, you can move it to a brighter spot or supplement its light with a grow light. 5.2 Water The Wandering Jew plant likes to be kept consistently moist but not waterlogged. Allow the top inch of soil to dry out before watering the plant again. Overwatering can lead to root rot, so make sure to avoid this by not letting the soil become too wet. If you're not sure when to water your plant, you can stick your finger into the soil to feel for moisture. 5.3 Temperature The Wandering Jew plant prefers temperatures between 60°F-85°F (15°C-29°C). It can tolerate cooler temperatures, but may not grow as well. Avoid placing the plant near drafty windows or doors, as sudden temperature changes can harm the plant. 5.4 Humidity The Wandering Jew plant prefers high humidity, so it's a good idea to mist it regularly or keep it in a humid environment. If the air in your home is dry, you can place a humidifier near the plant or group it with other plants to increase the humidity around it. 5.5 Propagation The Wandering Jew plant is easy to propagate from stem cuttings. Take a cutting that is at least 4 inches long and has several leaves. Remove the bottom leaves and place the cutting in a jar of water or moist potting soil. In a few weeks, roots should begin to form, and the cutting can be planted in a pot with soil. 5.6 Soil The Wandering Jew plant prefers well-draining soil that is rich in organic matter. Use a good-quality potting soil and make sure the pot has drainage holes to prevent water from accumulating at the bottom. 5.7 Fertilizer The Wandering Jew plant benefits from regular fertilization during the growing season (spring and summer). Use a balanced, water-soluble fertilizer and dilute it to half strength. Fertilize the plant every two to three weeks during the growing season, and stop fertilizing in the fall and winter. 5.8 Pruning Prune the Wandering Jew plant regularly to keep it from becoming too leggy. Pinch back the growing tips to encourage branching and promote bushy growth. You can also prune away any yellow or dead leaves to keep the plant looking healthy. 5.9 Pests and Diseases The Wandering Jew plant is generally resistant to pests and diseases, but it can be susceptible to spider mites, mealybugs, and scale insects. Check the plant regularly for signs of infestation, such as webs, sticky residue, or tiny insects. If you notice any pests, treat the plant with a natural or chemical insecticide. Avoid overwatering the plant, as this can lead to fungal diseases such as root rot. More information: * Wandering Jew Plant - primexgardencenter.com. * Wandering Jew Plant: Care - epicgardening.com. This blog entry has been viewed 434 times
Comments (0) | Leave a Comment | Permalink
How to Manage Fertilization in Gardens
Category: plants | Posted: Sat Mar 18, 2023 1:39 pm Fertilization is an essential aspect of gardening that helps plants to grow healthy and produce more fruits and flowers. However, it can be confusing for beginners to understand what kind of fertilizer to use, how much to apply, and when to apply it. In this article, we will provide you with tips and techniques to manage fertilization in gardens. 1. Understanding Fertilizers Before we delve into the details of fertilization, it's essential to understand what fertilizers are and what they do. Fertilizers are substances that provide essential nutrients to plants, such as nitrogen, phosphorus, and potassium. These nutrients are necessary for the plants to carry out various functions like photosynthesis, growth, and reproduction. There are two main types of fertilizers - organic and inorganic. Organic fertilizers are derived from natural sources, such as animal manure, compost, and bone meal. Inorganic fertilizers, on the other hand, are made from synthetic materials and minerals. They are often more concentrated and fast-acting than organic fertilizers. 2. Choosing the Right Fertilizer Choosing the right fertilizer for your garden can be tricky. There are several factors you need to consider, such as the type of soil, the type of plants you are growing, and the stage of growth. Here are some tips to help you choose the right fertilizer: Soil Test: Before adding any fertilizer to your garden, it's essential to test the soil. Soil testing can help you determine the pH level, nutrient content, and soil type. You can then choose a fertilizer that is tailored to your soil's needs. NPK Ratio: Fertilizers are labeled with an NPK ratio, which stands for nitrogen, phosphorus, and potassium. The NPK ratio indicates the percentage of each nutrient in the fertilizer. Different plants require different ratios of nutrients at different stages of growth. For instance, leafy plants require a higher percentage of nitrogen than flowering plants. Read the label carefully to choose a fertilizer that matches your plants' needs. Slow-Release vs. Fast-Acting: Slow-release fertilizers release nutrients slowly over time, while fast-acting fertilizers provide a quick burst of nutrients. Slow-release fertilizers are better suited for long-term growth, while fast-acting fertilizers are ideal for boosting plant growth during the growing season. 3. When to Fertilize Knowing when to fertilize is crucial for successful gardening. Fertilizing at the wrong time can harm plants and waste resources. Here are some general guidelines for when to fertilize: Spring: In the spring, plants begin to grow and need a boost of nutrients to support new growth. Apply fertilizer once the soil has warmed up and the plants start to show signs of growth. Summer: During the summer, plants are in full growth mode and require regular feeding. Apply fertilizer every four to six weeks during the growing season. Fall: In the fall, plants start to slow down their growth as they prepare for winter. Apply a slow-release fertilizer in the fall to provide nutrients for the plants during the winter months. Winter: Fertilizing during the winter is not recommended, as the cold temperatures can make it difficult for plants to absorb nutrients. 4. How to Apply Fertilizer Applying fertilizer correctly is essential to avoid over or under-fertilization. Here are some tips for applying fertilizer: Read the Instructions: Always read the instructions on the fertilizer package carefully. The instructions will tell you how much fertilizer to apply and how often. Water Before and After: Before applying fertilizer, water the plants thoroughly. This will help the fertilizer to dissolve and absorb into the soil. After applying fertilizer, water the plants again to help the nutrients to reach the plant roots and to prevent fertilizer burn. Spread Evenly: To ensure that all plants receive an equal amount of nutrients, spread the fertilizer evenly around the plant's base. Avoid applying fertilizer directly on the leaves or stems as this can cause damage. Use Appropriate Tools: Use a garden rake, a spreader, or a hand-held applicator to spread the fertilizer evenly. This will prevent the fertilizer from clumping and ensure that it is distributed evenly. 5. Organic Alternatives to Chemical Fertilizers If you prefer to use organic alternatives to chemical fertilizers, there are several options available: Compost: Composting is an excellent way to enrich the soil naturally. Compost is a mixture of organic matter, such as leaves, grass clippings, and kitchen scraps, that have been broken down into a nutrient-rich soil amendment. Manure: Animal manure, such as cow, horse, or chicken manure, is an excellent source of organic nutrients for plants. However, manure should be aged or composted before use to avoid burning plants. Fish Emulsion: Fish emulsion is a liquid organic fertilizer made from fish waste. It's high in nitrogen and can be used to fertilize both indoor and outdoor plants. Bone Meal: Bone meal is a slow-release organic fertilizer made from ground-up animal bones. It's high in phosphorus and calcium and is ideal for flowering and fruiting plants. In conclusion, fertilization is an essential aspect of gardening that can help plants grow healthy and produce more fruits and flowers. By understanding the different types of fertilizers, choosing the right fertilizer for your plants, knowing when to fertilize, and how to apply fertilizer correctly, you can ensure that your garden thrives. Additionally, using organic alternatives to chemical fertilizers can provide you with a more sustainable and eco-friendly way to nourish your plants. Happy gardening! Sources: University of Florida IFAS Extension. (n.d.). Fertilizing the Vegetable Garden. https://edis.ifas.ufl.edu/publication/VH021 University of Maryland Extension. (n.d.). Fertilizing Trees and Shrubs. https://extension.umd.edu/hgic/topics/fertilizing-trees-and-shrubs Blog specialized in fertilization. https://fertilizerfor.com/ Colorado State University Extension. (2021). Fertilizing Gardens. https://extension.colostate.edu/topic-areas/yard-garden/fertilizing-gardens-7-238/ This blog entry has been viewed 270 times
Comments (0) | Leave a Comment | Permalink
You're reading one of many blogs on GardenStew.com.
Register for free and start your own blog today. |
|
