|
Recent Entries to this Blog
Is It Really.....?
Posted: 16 Mar 2015 Posted: 06 Oct 2014 Posted: 29 Aug 2014 Posted: 28 Aug 2014 Posted: 30 Jul 2014 All Entries |
Jewell's BlogRamblings from the Puget Sound
Making a Living Wreath
Category: Crafts | Posted: Sat Aug 29, 2009 4:38 pm AM: Ok, so I always jump in with both feet and then find out how to do something. Yesterday I made my first wreath with a few rooted sedums (out of my many pots of starts and some escaped sedums from the lawn), moss from the yard/grass, florist wire and a metal frame (only $2.49). The wreath looks very thin to me. I had trouble finding enough moss from the lawn since it has been so dry. I didn't wet the potting soil and pack it and I think I should have. Despite all, I kind of like it and I am going to be trying to make another couple of them with more sedums, packed soil and more moss (bought a big bag at the local nursery). 
first attempt at making a living wreath ( photo / image / picture from Jewell2009's Garden ) I did some research online and found out it suggested to use cuttings of the sedums. I will cut some; let them callus and get busy later this afternoon. Also I should be using copper wire. Don't know if I will or go with the florist wire I already have on hand. Definitely should make a hanger instead of hanging on the wire frame. I will fix my first one and do this for the rest I make. This should be a great rainy day project. More to come: PM: I did some more reading from a number of sources and found the history and variety of wreaths interesting. Some wreaths have lasted decades. Some say that they originated in California to replace traditional Christmas wreathes that would dry out in the hot Santa Anna winds. In warmer areas of the Southwest they use cactus. Any hardy sedums that can survive your climate would work well. All the pictures I found were of well developed wreaths that looked fat and happy. The ones sold at the local farmers market have very few plants, but are a nice rounded full look of the moss wreath. That is what I want mine to look like but with more plants. I get set up and get ready to begin. I have my metal frame, scissors for cutting plants and florist wire, a big sack of moss, a bucket of water and lots of plants to choose from. I thought about using rooting hormone, but didn't. 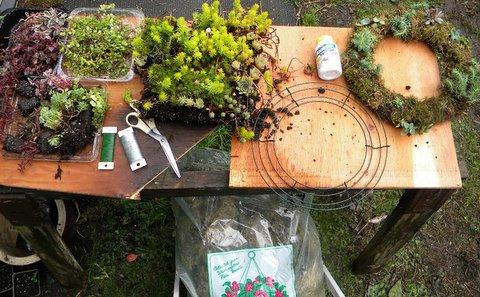
set-up for starting wreath making ( photo / image / picture from Jewell2009's Garden ) I decided to take apart the first one I made. 1. When I was finished with that I laid down the moss in sheets over the metal wreath frame. I continued to cover the frame until it looked like a big blob of moss. The moss should be damp to make it easier to work with. I tried to make sure that the sheets of moss were centered on the metal frame of the ring. 2. I then started adding my rooted cuttings to the frame and potting soil to make the thickness look even. I think it would be easier to use unrooted cuttings as suggested from another source I had read and simply make the frame first with damp moss and covering moistened potting soil. 3. This was the hardest part for me, wrapping the moss and frame with wire. I then started wrapping with florists wire. Some suggested using copper wire because it would last longer. Online directions had mentioned starting in one place and slowly working your way around with tight wraps of wire. I found that my frustration level with this method was too high because moss and plants tended to move. I went around first with the intent to hold things somewhat in place and then went around several more times adding moss, more plants and trying to make the wreath an even thickness. You need to be careful not to cut the sedums with the wire. If you do just use a dibble (mine was a pencil) to stick the broken pieces into the wreath. I continued to add moss and plants until I was tired out and somewhat satisfied. This wreath was much heavier than the first, because it had more wet dirt and plants. I like it better and think that it will fill in faster. Tomorrow I want to try making another using red and chartreuse sedums. 4. I made a hanger out of some plastic coated wire I had on hand. Any heavier gauge wire would work. You just have to be able to bend and wrap it tightly around the wreath frame and not have it stretch out and come undone. 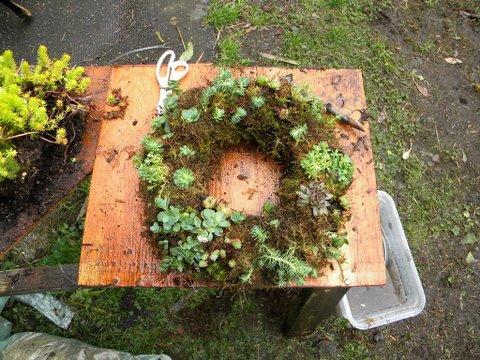
finally wrapped up ( photo / image / picture from Jewell2009's Garden ) For the holidays you could easily add berries or temporary seasonal decorations. Some wreaths made in the 1980s are still living. Many seasons/decades of joy can be had from your efforts. Watering is recommended only every few weeks at most, and less depending on the time of year and weather. 
Wreath hanging and finished ( photo / image / picture from Jewell2009's Garden ) If you are really interested in making a living wreath I posted easy instructions in the Arts and Crafts Form. The instructions are at http://www.gardenstew.com/about16646.html I worked out all the bugs using a wide variety of resources perfecting the method that I struggled with in my blog. Enjoy. Last edited: Sun Aug 30, 2009 9:24 pm This blog entry has been viewed 2362 times
You're reading one of many blogs on GardenStew.com.
Register for free and start your own blog today. |
Entries by Category
All Categories
|
