|
Recent Entries to this Blog
Windchimes-Love or Hate
Posted: 31 Mar 2011 Posted: 31 Mar 2011 Posted: 21 Feb 2010 Posted: 28 Nov 2009 Posted: 10 Feb 2009 All Entries |
Decorative Greenhouse StartupWe got our old windows and some assorted junk and we are ready to roll. Here's some old spindles and stuff from the dump we will decorate it with. The headboard in the back is oak and will probably end up with stained glass panels in it for another time. 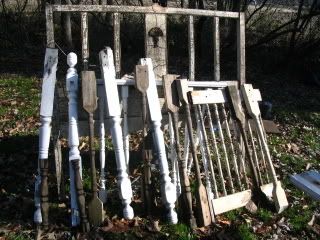
I have primed all the windows and the first thing we do for the four windows for the body is to take off aluminum strips and rip the edges to get rid of the grooved parts. We save these strips for later use. We are predrilling all the holes and using screws. This is a two person job as the windows are unwieldly. Now the box is made. The door will be taken off and hinged later. 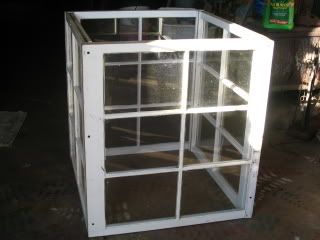
We throw this dropcloth on the floor so we can kneel on it since it's cold but when we turn around... My Sheppies have taken over. 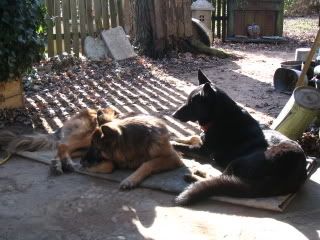
The feet are cut off some old bed footboard and are put on. The round ones are in front. Mark this stuff or you are sure to get confused. 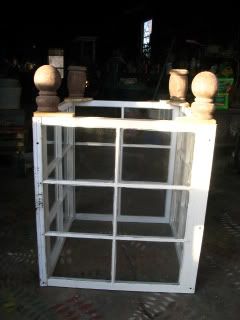
For the roof we hold up these slightly larger windows and measure the angle. After figuring out our fractions we see that our miter saw will not cut this deep so we decide to go with a 45 degree angle. Once we put it on there will be only a very tiny gap that we'll caulk on the inside when building and on the outside after it is in place. We take the roof back off and rip the very point off the roofline so the dowel can lay flat. The dowel is not affixed at this point. 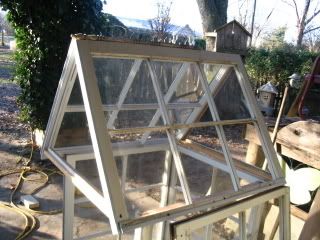
Now we take the little strips we ripped off the windows and use these to hold the glass in place. The strips are put on with our little brad gun. You could use little nails or even a good glue for this. 
The picture shows what the glass will be put against then more strips will be put in front of the glass to sandwich it in. The grooves left on the edge will have dowels in them. Now we are done for this weekend. Hubby has had his sandblasting equipment out recently so I ask him if he will blast some glass for me if I get it ready. He gives me "the look." He asks me if he has ever said no to me. Actually he hasn't but I don't push it. First contac paper is put on the window, no air bubbles allowed. Then the pattern is put on the other side of the window. Now the pattern is cut out with a razor knife and pulled off. This photo is of the door. 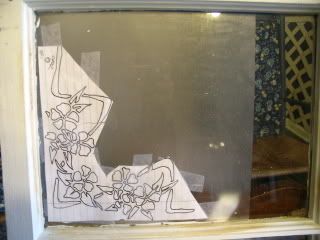
Now the door is blasted and the trim painted. I got this doorknob set at the junkyard. 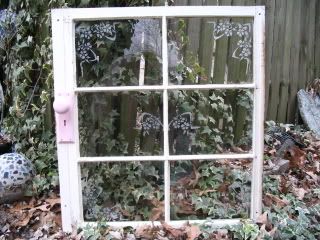
The roof triangle is done. I have laid it on my bed so it will show up good. Hubby was pleased to see our initials on it. I know this way it CAN'T be sold! Look close and you will see where I forgot to cut out one flower center! AAARGGGH! 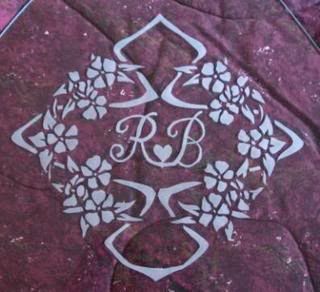
We cut and paint the spindles and such. We put the glass in the roof front. The back glass we think we will put mirror in. If we hang a windchime in the roof it will reflect nicely. Here is where we are now. 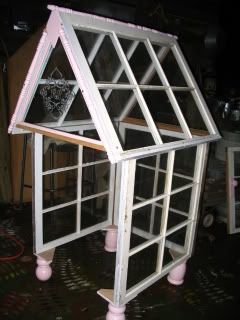
This blog entry has been viewed 2160 times
You're reading one of many blogs on GardenStew.com.
Register for free and start your own blog today.
Beyhie that is looking great.I'm glad you want be selling it.Thats going to be gorgeous piece of work.
That is fantastic Bethie. Clever to put your initials in the design to claim it for yourself.
Looks good. I want to do more structures in my garden.
It looks good, bethie. No wonder with all the care and attention to detail you and your husband give it.
Looks great Bethie! Which lucky plants will get to grow inside when you are done?
Those look great Bethie,, i have a few of those too. My husband used pinned hinges, so all we have to do is pop the pin an take them down for winter,, I love the detail you put on the glass,, beautiful touch, an work well done!!!
O that is so beautiful!!! Sandblasting is something I wanted to try with the windows on my studio... wish I was brave enough to tackle my table saw, lol!
That looks great! I can't imagine gardening without one now. I find them so helpful...and there are some things that I simply wouldn't be able to grow without it.
Login or register to leave a comment. |
Archives
All Entries |
