|
Recent Entries to this Blog
Windchimes-Love or Hate
Posted: 31 Mar 2011 Posted: 31 Mar 2011 Posted: 21 Feb 2010 Posted: 28 Nov 2009 Posted: 10 Feb 2009 All Entries |
Garden Sinks (mosaic)This summer I told hubby I wanted to mosaic and old sink to put in my landscape. He reminded me there was an old sink in the shop when we bought the house and it was up in the rafters. He got a ladder amidst the "be careful" and "don't hurt yourself" and brought down a lovely cast iron sink. We looked around the shop and came up with a heavy metal stool that he took the back off and we inverted to be the sink stand. I had my heart set on a spot near my patio that is heavily landscaped and was happily amazed that this would be a perfect fit. Hubby leveled and put the stand in place so I could plant around it while the sink was pending. I decided to keep it fairly simple since there is a lot going on in my yard. I just scribble some directional lines on the sink and cut some glass and start. This multicolored glass is all off one sheet that was left over from a church window hubby made, in other words FREE! 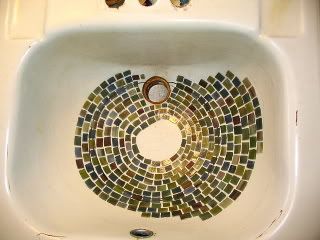
I decide to use old spouts I get at the junkyard. I like a rustic look. Hubby does all the grouting.We go with gray grout for this one. 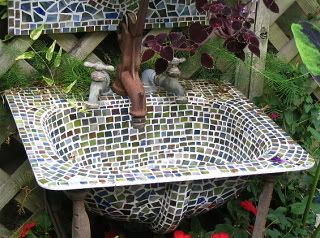
I decide it would be nice to have a matching mirror over the sink. Hubby cuts the rectangle out of concrete backer board. I make the middle real mirror so it can reflect some of the plants around and a hypertufa vase that is sitting across from it. 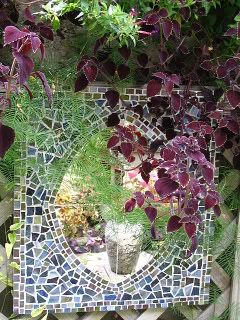
In goes the finished sink like it's been there forever. It's right up against my stormhouse which has lattice in front of it. The plants are spilling down from a big hypertufa trough. 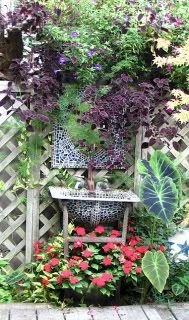
Now hubby comes home with a little sink he bought at the junkyard for $1. 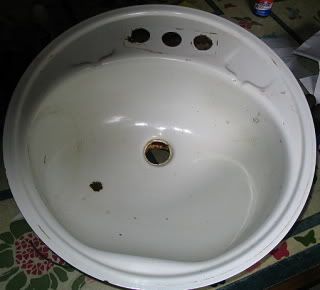
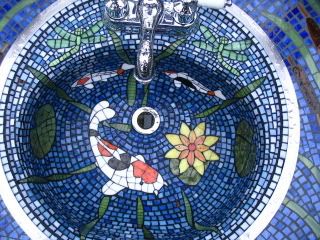
We decide to make this a Big Project which we will eventually sell. We agree on the idea that the sink will be a koi pond and the countertop will be the pond verge. Hubby says he will do the cut glass and I will do the mosaic. He cuts out the countertop from backerboard and brings it in. I trace it and start drawing the patterns. I copy the patterns and give them to him. He glues them on the glass, cuts and grinds them and brings them back to me. I recut them as I glue them. Since the sink is very curved I will take one piece and sometimes recut it in as many as 10 pieces and then glue it back together on the sink.This takes Forever.The cut glass design elements are glued on first and then the water is added. 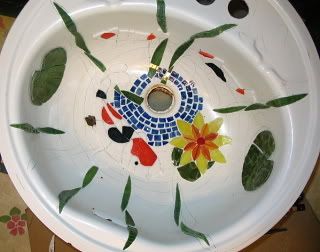
I start at the drainhole of the sink with a dark blue glass and get lighter as I go to the top. Now the sink is glassed and ready for hubby to grout. We are going with black grout. 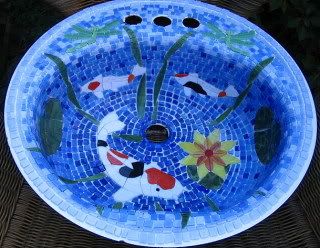
We build the frame out of cypress. We find cypress 2x4"s at the junkyard for $1 each. Hooray! The shelf on the bottom will be hardware cloth(RATWIRE!) so water won't rot it. 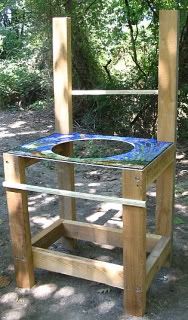
We decide to make a little backsplash so hubby cuts it out and drills the screw holes and gives it to me to glass. We decide on shelf brackets for the top and make a simple pattern for that. I decide we need a little piece to hang from the shelf. We decide on cattails. I draw this and cut it out of copper. Hubby says he will finish it and he does. 
We give the snails "irridized slime trails" just for Fun. 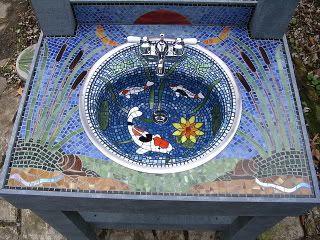
We want a color on the wood so we use one of the colored latex stains. This product is Wonderful. The look of paint but not the maintenance. I'm not quite happy with the plain gray so I tint some darker and daub it on with a plastic bag. 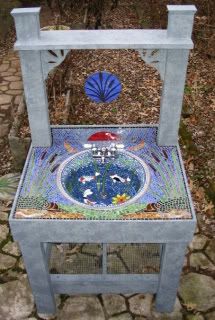
We decide to use a new fixture on this one and Finally we are done. 
This blog entry has been viewed 14381 times
You're reading one of many blogs on GardenStew.com.
Register for free and start your own blog today.
Oh Bethie what a talented couple you and your hubby are!!! What gorgeous work you do with mosaics and I love both but I think my favourite is the one you have in your garden. It looks wonderful with the mirror and the planting. How I wish I could do something like that for my own garden.
Bethie, I have often said that you and hubby's work is impecible. There really aren't enough (or at least the right ones) adjectives to describe how beautiful your pieces are. You should be published in a (or several) home magazine(s). Just amazingly beautiful.
Your design is fantastic. Love the colors and total integration of the pictures.
Bethie those are absolutely beautiful.Ya'll always do such wonderful work.
Bethie, You & your hubby are a great team! I'm just wondering what glue you used, since this will be outside? As a glass artist myself, there's a huge difference between having a fabulous idea and actually completing the work.....that's where I have trouble. But your work is so inspiring, thank you for sharing! I always look at your blog entries as soon as I am notified.
It's amazing what you manage to do with coloured bits and pieces and an old piece of furniture! I'm drooling, and admire you both enormously.
That's gorgeous Bethie, how long did it take from start to finish?
Stunning, as always! The fish especially look very like batik with the black grout, very inspired. Do you sand the porcelain or something to let the work cling to it? It seems like it would pull right off porcelain (just curious, if it's a trade secret I understand, lol!)
CritterPainter. I do rough it up a little with a sanding block and glue one piece of glass on it. After 24 hours I see if it's a good bond before proceeding. It's a great bond on this surface. I love batiks and have many.
beautiful work you both do. thanks for sharing and keep up the great job. vicki
Those are absolute works of art. What a wonderful addition to a lush garden and appears as though it was made for that spot.
Debbie- I use a 100% silicone sealant made by GE. It's great outside and reasonably priced.
WoW, there Amazing,Truely Amazing. Login or register to leave a comment. |
Archives
All Entries |
