|
Recent Entries to this Blog
Windchimes-Love or Hate
Posted: 31 Mar 2011 Posted: 31 Mar 2011 Posted: 21 Feb 2010 Posted: 28 Nov 2009 Posted: 10 Feb 2009 All Entries |
bethie's Blog
The Beadmakers Art
Category: bethie's world | Posted: Thu Apr 03, 2008 5:52 pm Several years ago we had some birthday money and decided to get us a beadmaking kit. These have everything you need to get started except the bottled gas. You can get that at home improvement centers. The bead kit runs about $100 but was recently on sale at the Hobby Lobby for $75. When we got it home and set it up I had hubby start to make beads, in case it blew up or something. He was so very good at it that he has worked in the flame ever since and I assist and do the bead designing. It just worked out that way. He doesn't really like to pick out colors and such and that is the BEST part. I study up on new techniques and then he learns them! He is so great. Once the bead goes into the flame it stays there until it is done. You wave it in and out of the flame as you work on it. Too long in the flame and it will melt and fall off. Too long out of the flame and it will go into shock and break. It is a somewhat graceful hand dance. Once the bead goes into the flame it is usually molten orange so you need to plan your colors beforehand. When the bead is completed it goes into the fiberglass blankets to cool slowly. In this photo a bead is in the flame and he is holding a graphite marver in the other hand. The bead is rolled and shaped on this as you work on it. There's another marver laying on the table with frit on it that I made. Frit is pieces of the bead rods broken up into different sizes and colors and then picked up on the hot bead. 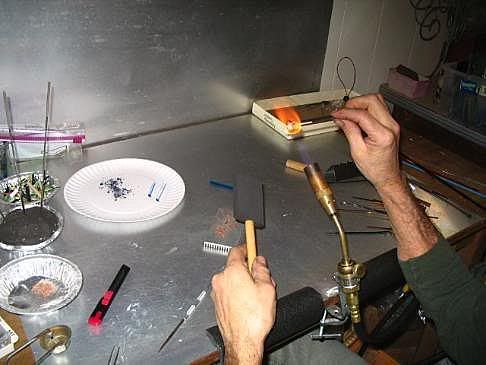
Frit with bead. 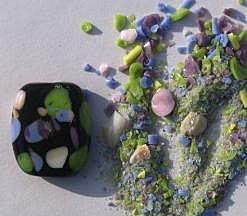
In this photo you can see the cooling blankets on the table beyond him. They look like cotton batting. At the end of the table near the doorknob is where I sit. Those plastic boxes are those day pill things and they are full of frit of all different sizes and colors. I put it on a marver as needed and push it over to him when he's ready for it. 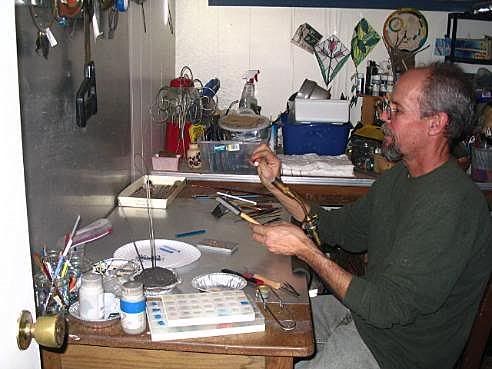
These glass rods are made in advance and then cooled and put on beads. You take glass rods of different colors and tape then together. They go into the flame and you pull molten glass out of them simultaniously and twist it as you pull. You cool them and then they can be used different ways on beads. 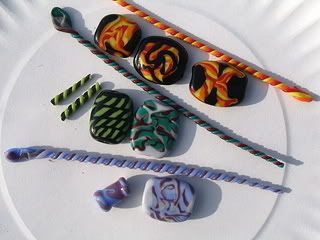
This bead has silver leaf on it. The bead is made of trasparant glass.The leaf is cut up by me and put on a marver. You can't touch this stuff with your hands at all. It's very light also. We were back there yucking it up and I looked down and all my leaf had blown away! Now I keep it a little further away. On the odd shaped bead the leaf is on the surface. On the round bead on the end it is in between layers of glass. There are a million ways to make beads. 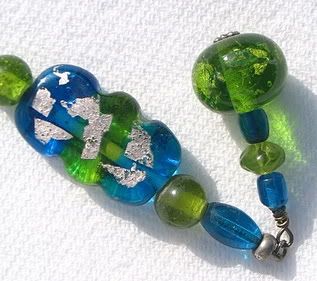
Many bead techniques use dots. Dots of colors are put on the beads and then manipulated into shapes. These ferns are made with dots that are then pulled to give them their graceful shape. 
This bead is a dark brown bead. Then white dots were put on it then amber dots were put over the white. While the amber dots were still raised up the dark frit was picked up. At the very end it was "smashed" to give it this flattened shape. 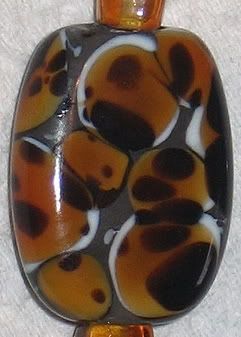
These are some camo "man beads." They can be used as zipper pulls on jackets or on coolers and keyrings. 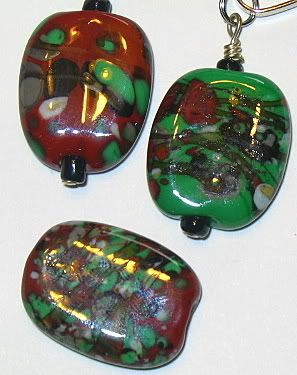
Some beads are just for fun. 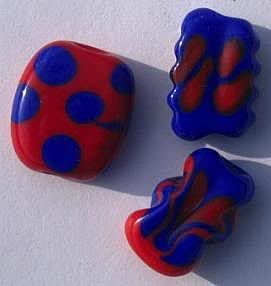
These sparkly beauties are made with dichroic glass. It is applied to the bead near the end. It can't stay in the flame too long or it loses its sparkle so it must be worked very gently. I love this stuff! 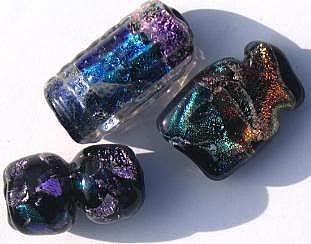
These flower beads are still on the mandrels. The leaves are green dots that are then pulled into shape. The light gray above and below the bead is a release agent that is dried on the mandrel before the glass is put on it. These take a good while to make as the pattern is on both sides. We don't sell these but like to give them as gifts to flower lovers. 
Some "eye beads" and amber necklace beads. The amber beads are "smashed" to give this shape. The amber beads are very popular here. 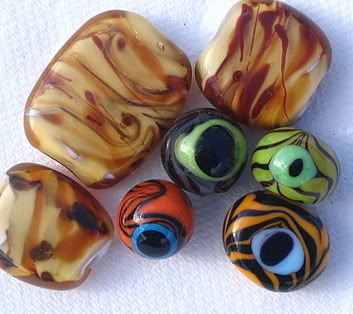
We buy glass beads and make jewelery to sell. I do the beading part of the necklace and hubby does the silk cord and the rest of the wirework. The handmade bead is always the centerpiece. This is an amber bead with silver leaf that is burned on it to give it a gold look. 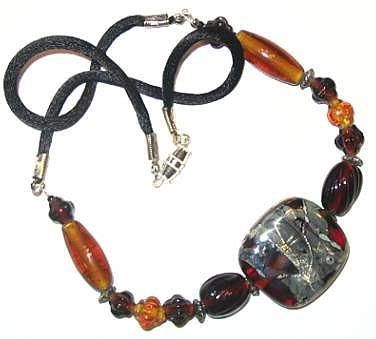
I make lots of mix and match earrings to coordinate with. 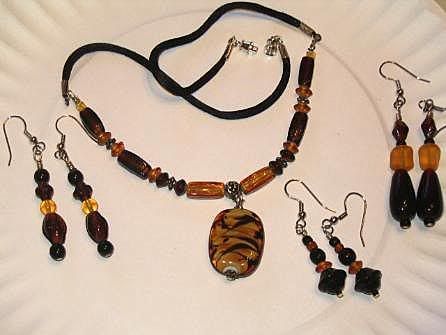
We don't usually make handmade matching earrings but this one is mine and I DO sleep with the beadmaker. 
This is another of my personal pieces so I get 5 handmade beads on this one all made to my specifications. What a guy! 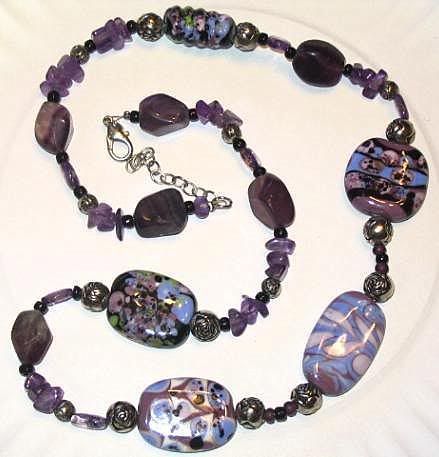
When I first suggested making face beads hubby just couldn't believe he could do it-but I did. These are hard to make and Never sold either. It's the only time I recall us discussing makeup colors! The wires are on them because they hang on the knobs of my stereo. You don't have to wear beads to enjoy them. 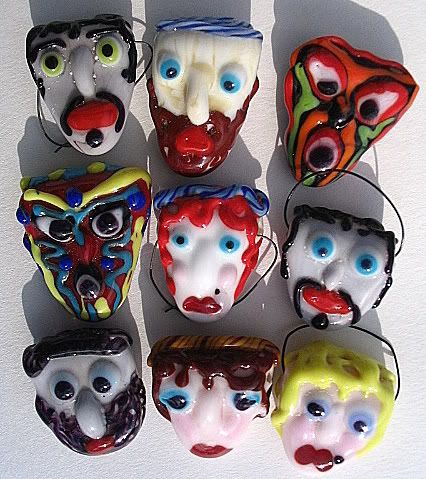
Imaginative, creative, FUN. This blog entry has been viewed 941 times
Decorative Greenhouse Startup
Category: bethie's world | Posted: Wed Jan 16, 2008 4:00 pm We got our old windows and some assorted junk and we are ready to roll. Here's some old spindles and stuff from the dump we will decorate it with. The headboard in the back is oak and will probably end up with stained glass panels in it for another time. 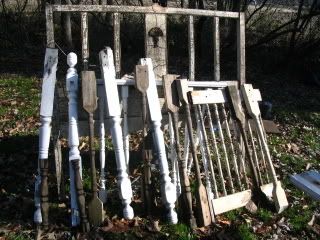
I have primed all the windows and the first thing we do for the four windows for the body is to take off aluminum strips and rip the edges to get rid of the grooved parts. We save these strips for later use. We are predrilling all the holes and using screws. This is a two person job as the windows are unwieldly. Now the box is made. The door will be taken off and hinged later. 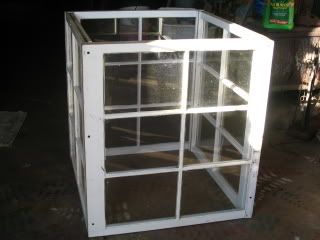
We throw this dropcloth on the floor so we can kneel on it since it's cold but when we turn around... My Sheppies have taken over. 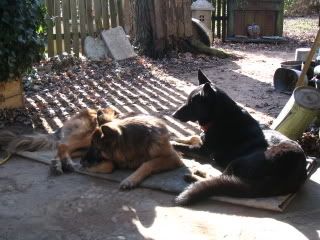
The feet are cut off some old bed footboard and are put on. The round ones are in front. Mark this stuff or you are sure to get confused. 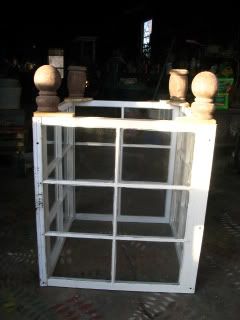
For the roof we hold up these slightly larger windows and measure the angle. After figuring out our fractions we see that our miter saw will not cut this deep so we decide to go with a 45 degree angle. Once we put it on there will be only a very tiny gap that we'll caulk on the inside when building and on the outside after it is in place. We take the roof back off and rip the very point off the roofline so the dowel can lay flat. The dowel is not affixed at this point. 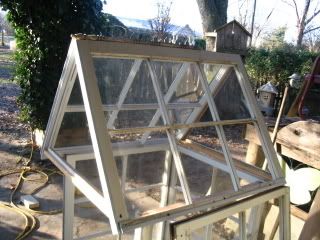
Now we take the little strips we ripped off the windows and use these to hold the glass in place. The strips are put on with our little brad gun. You could use little nails or even a good glue for this. 
The picture shows what the glass will be put against then more strips will be put in front of the glass to sandwich it in. The grooves left on the edge will have dowels in them. Now we are done for this weekend. Hubby has had his sandblasting equipment out recently so I ask him if he will blast some glass for me if I get it ready. He gives me "the look." He asks me if he has ever said no to me. Actually he hasn't but I don't push it. First contac paper is put on the window, no air bubbles allowed. Then the pattern is put on the other side of the window. Now the pattern is cut out with a razor knife and pulled off. This photo is of the door. 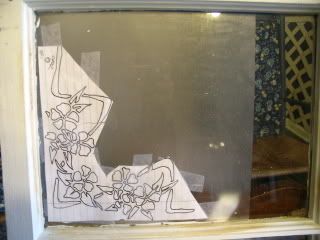
Now the door is blasted and the trim painted. I got this doorknob set at the junkyard. 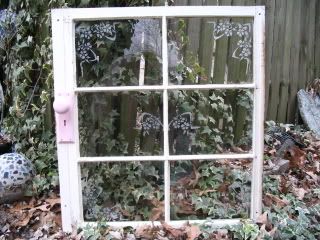
The roof triangle is done. I have laid it on my bed so it will show up good. Hubby was pleased to see our initials on it. I know this way it CAN'T be sold! Look close and you will see where I forgot to cut out one flower center! AAARGGGH! 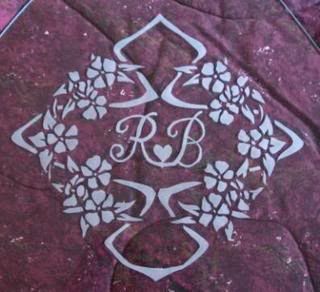
We cut and paint the spindles and such. We put the glass in the roof front. The back glass we think we will put mirror in. If we hang a windchime in the roof it will reflect nicely. Here is where we are now. 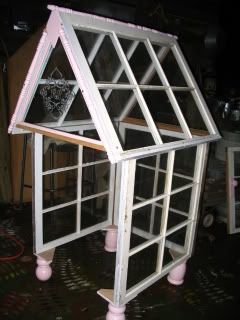
This blog entry has been viewed 2316 times
Christmas Presents, Past & Present
Category: bethie's world | Posted: Wed Dec 12, 2007 9:23 pm Well, hubby and I just finished several new pieces and I thought I would put them in. First I thought I would show some past presents. Someone nicely loaned me their scanner. Some things made out of wood. We were lucky enough to be offered some wood off a barn being torn down and we decided to make this large Tenn. Flag for our local library. We love books! Hubby even hung it for them. 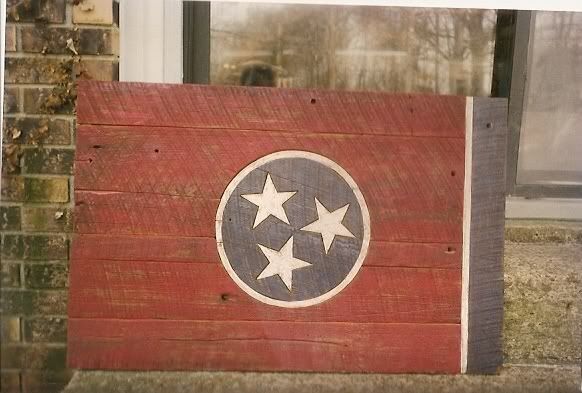
This fish was carved and then woodburned. 
These all swam away one Christmas. 
Birdhouse clocks for everyone. 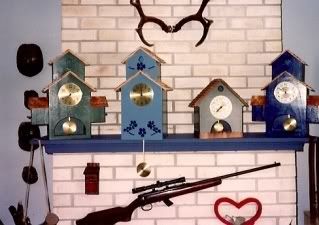
Little greenhouses one year. 
Yes, I am on my own Christmas list! 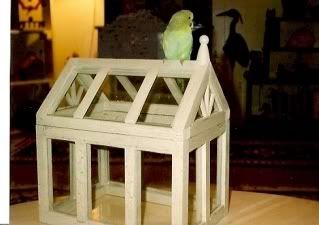
I made this pattern for some kinfolks that long for HOME. 
Color makes a big difference. 
Of course our main love is stained glass. This was a baby shower gift. 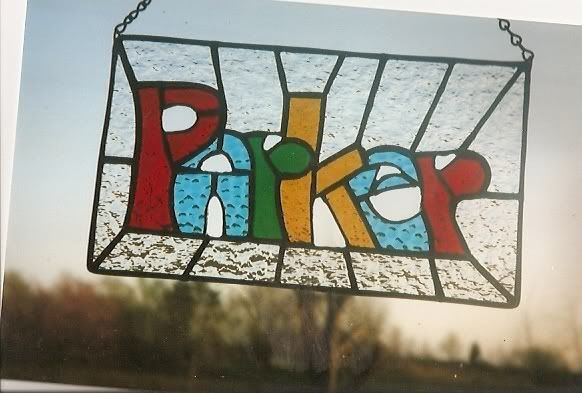
Hubby's Mom is a wonderful seamstress. We were able to solder real pins to this piece. 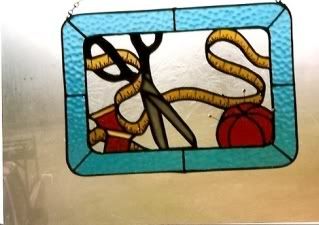
There's always a cat lover on your list. 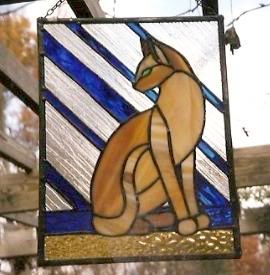
And an owl lover too. 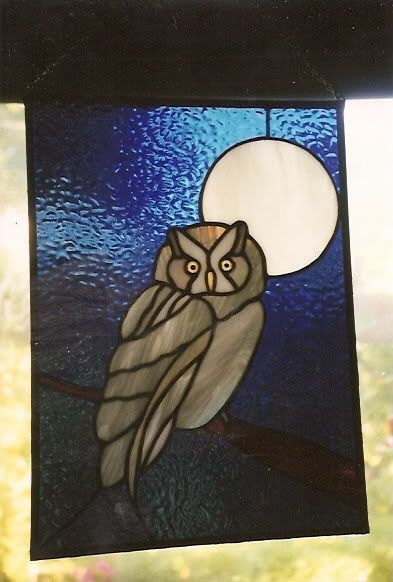
This is a mosaic piece I just finished this morning. It was inspired by my lusting after Zuzu's orchids. 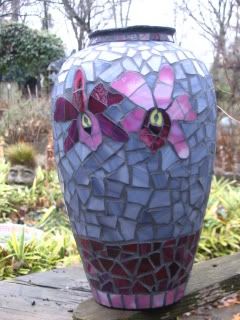
Just finished this one also. 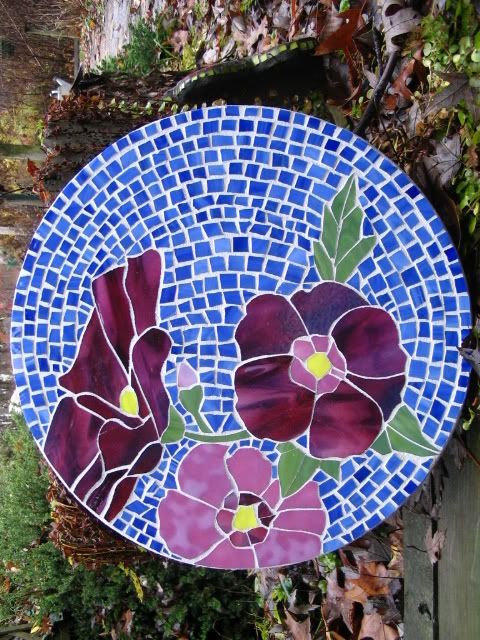
Back to work for me. This blog entry has been viewed 944 times
Trellis/mosaic project
Category: bethie's world | Posted: Mon Oct 15, 2007 7:19 pm Hubby and I just finished this piece for a client. She just had her house painted so her plants are cut way back and she wanted a change. She wanted a large mosaic centerpiece for the wall so I looked at her space. 
I suggested instead of just a mosaic floating on the wall that we incorporate it into a trellis that will give some vertical interest to the space. My hubby agrees to build it. My husband cuts out the concrete backer board into a two and a half foot octagon for the mosaic plaque. Now the part of the glass that is cut with a glass cutter is cut and glued with silicone glue. 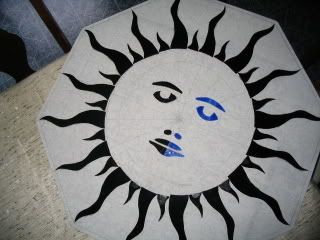
I found this design on the web and just loved it. On the blue side it is a moon face also. Now all the rest of the pieces will be cut with mosaic glass pliers. Snap, snap snap. If you can't cut glass the whole piece could be made this way to good effect. Now I am piecing and glueing. I am going with black grout so the blue pieces around the rays are glued very tightly against them. This is more labor intensive than if the grout was a different color but I want black grout. 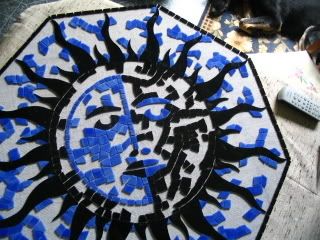
Days later I am finally done with the piecing. It now sits 48 hours for maximum glue curing. 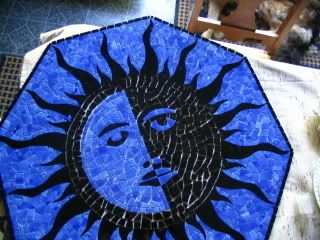
Now hubby works his magic with the grout. He is GOOD at this. 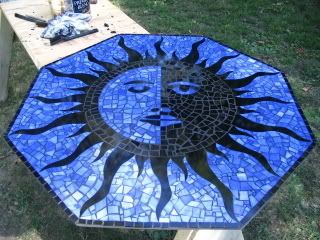
Now we decide the dimensions and start the trellis. It's made out of treated deck boards that hubby rips. It will be attached to the house itself but the trellis will be two inches from the wall so a plant can climb it. 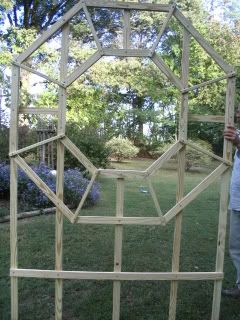
Now hubby goes and installs it and all are pleased. 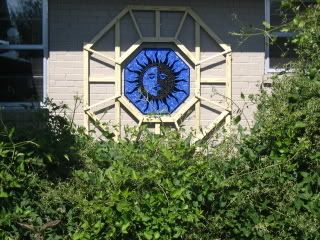
In the meantime I make this fun planter from Hummingbird's recipe. 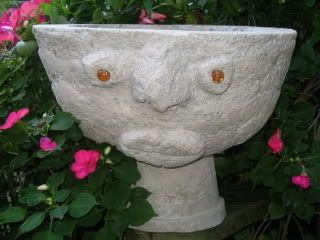
Then I glass it and hubby grouts it. Now I just need to get a plant.... That's a problem I LIKE. 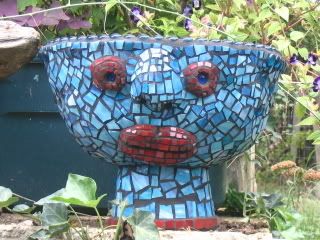
This blog entry has been viewed 1209 times
Making A Mosaic birdbath
Category: bethie's world | Posted: Sun Jun 24, 2007 3:50 pm Well the hubby has talked from time to time about making a mosaic birdbath. First he had to find a shallow one piece low birdbath. Birds really like shallow water. He finally found one he liked and brought it home. I asked him if he had any preconceived ideas for design or color and he said "no." Hooray- now it can be just what I want. First we drag it around to several places it might look good. We decide to nestle it in some mini- varigated bamboo that I have trimmed like a hedge. Now I am ready for design and color. I decide on a kind of Mer-Lady. I want something that doesn't fade into the background because I have a lot going on here. So I draw her and here she is. You can see where I have made corrections on the original. 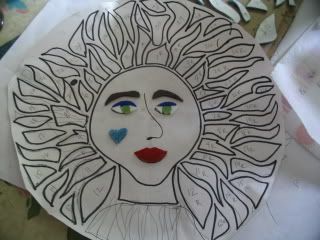
Before hubby goes out the door he says if I have the pattern cut out when he gets back he will be happy to start cutting glass. You don't have to tell me twice so I get busy. I need three copies of the pattern. One will be cut out and glued with rubber cement to the glass that will be cut with a glass cutter. They will be cut and ground with the paper on them. One copy is a map that you will need to lay the cut pieces on and the third I will use to put the design on the birdbath and put in my files. Since the birdbath is concave I will cut the pattern in pieces to get it to lay flat in the birbath. Now hubby has cut the glass that is cut out and given it to me. I take the paper off every piece and clean and dry it with windex and lay it on the map. 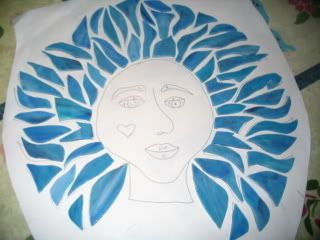
Now I will take the hair and snap each piece into 4 or 5 and lay it back on the map. This is done because I want the hair to look like long pieces but it has to conform to the curvature of the birdbath. This takes some time and when I am half done I decide I better start glueing it. If someone knocks this glass off this paper I will be in big trouble. 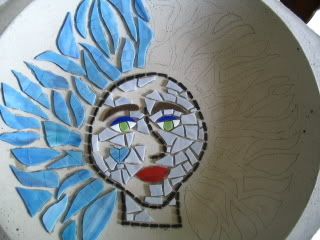
Now I am using my 100% silicone glue. This makes a great waterproof bond. I know how good because now that I decide on red for the outline I change the heart on her face to red and have a time prying up the blue heart. Then I am finished with the glue. I get my razor knife and trim all excess glue from the edge. Now the piece sits for a full 48 hours to cure. We decide on a pale gray grout to match her face. We could go with black. That would give her kind of a broken puppet look that would be interesting also. Hubby does his usual great job of grouting. It sits for 24 hours now and then I clean it with a ceramic tool and some little wire brushes. It's ready. 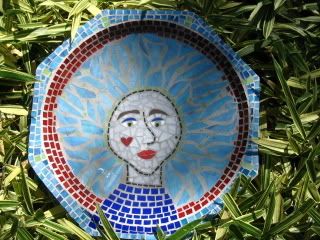
She nestles right into this bed as if she were made for it! 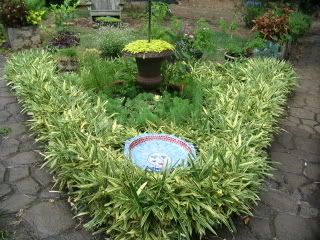
This blog entry has been viewed 7916 times
Cousin Cindy
Category: bethie's world | Posted: Mon Jun 04, 2007 8:42 pm Cindy is my hubby's first cousin and Our Good Friend. I first met her when I came to Tennessee to live and she came to visit her Grandmother. We saw her every year after that and eventually she came to live in our little rural backwater. She fully embraces the country lifestyle so I asked if I could come and take a few pics. She said yes so here we go on a tour of Cindy's Place in the World. Here's a few flowers in bloom. 
Not sure what this is but dug up a few young ones for myself. It reseeds readily. 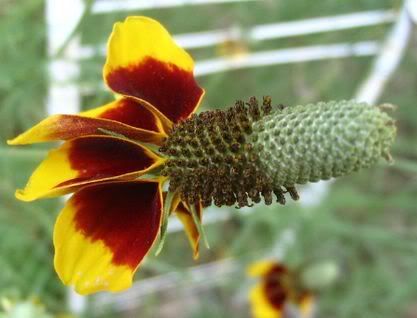
This santolina was stunning in the late afternoon sunlight. 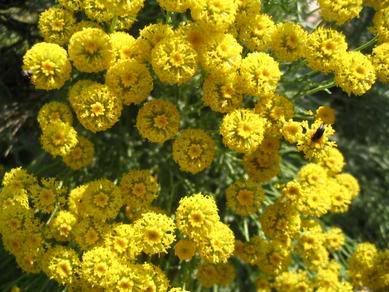
Gentle beauty meets the eye at every turn. 
Interesting bits of wood abound. 
No shed should be without a dressing of rusty tools. 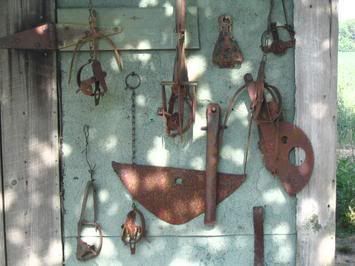
This lovely pot on it's perilous perch. Is that it's predecessor down there or just for fun? You decide. 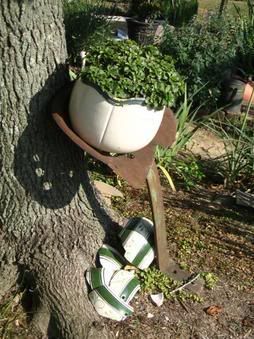
Beautiful butterfly weed. 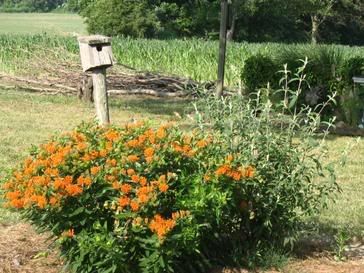
An interesting dish catches our eye. 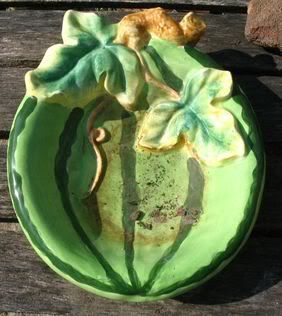
A scenic little twig arch. 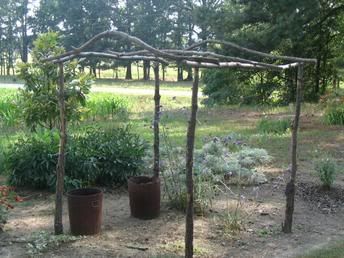
Why there's a beautiful kitty. 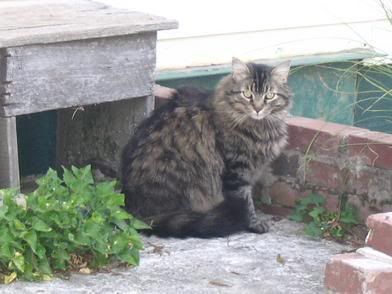
Let's rest a spell and go on in. 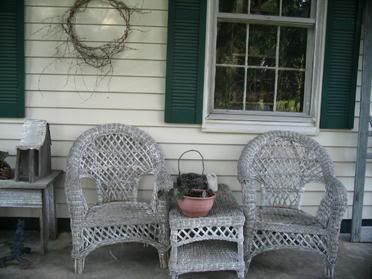
In the early evening shadows the waterford crystal still dazzles. 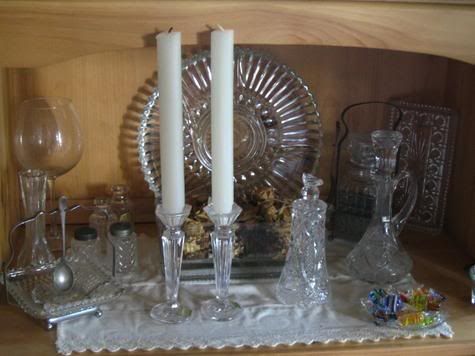
Why there's Pappy looking like he could climb right out of the photo and turn the radio on while he's reading his paper. 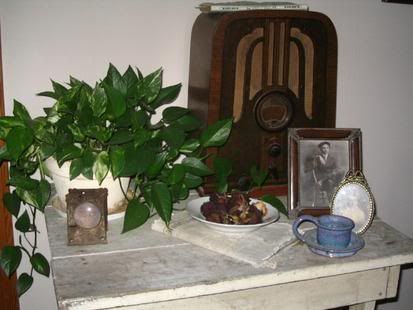
Goldilock's herself couldn't resist this pretty bed with the late evening sun slanting in the window. I am no exception so Gentle Reader, I bid you goodnight. 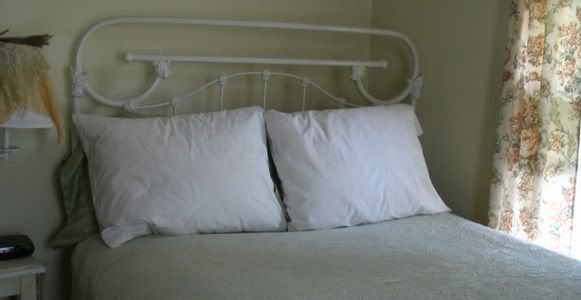
This blog entry has been viewed 1180 times
Hypertufa Eggs
Category: bethie's world | Posted: Mon Apr 23, 2007 8:23 pm Well, last summer a friend came over so I could help her make some hypertufa faces. There was a little mix left over so I told her we could just dump it out. Instead she made an egg and went home. Her faces cured and so did the egg. I kept walking by that egg and came up with an idea. I would mosaic that egg like and Easter egg. I had just gotten some pricey mirror glass but I knew it wouldn't take much. Hubby was instantly on board for the grouting. We decided to surprise our friend with this egg when she came to pick up her stuff. 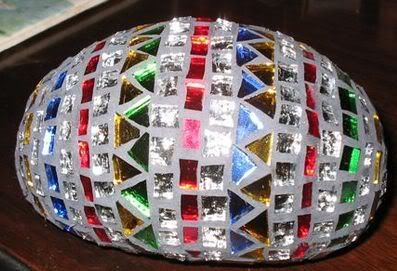
She was delighted with it but the joke was on us. She didn't even Remember making the egg! I have went on and made these eggs whenever I have a little hypertufa left from another project and then I mosaic them at my leisure. 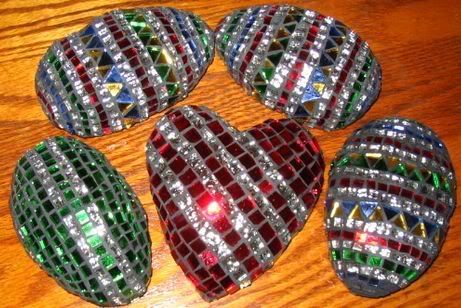
I started some last week. I put pencil lines in the center of the egg and glass this first. That keeps everything straight. I go round and around working on about five at a time. 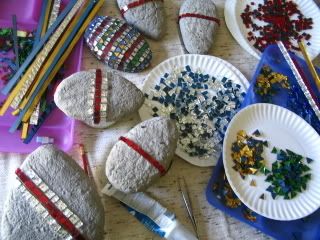
Then hubby works his "grouty majic" and they are done just lacking a little cleaning. They are about 6by4inches. They throw off sparks in the sun like crazy. 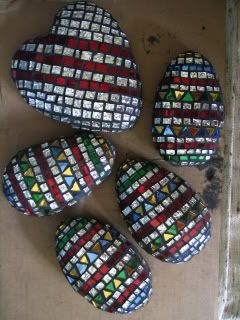
This blog entry has been viewed 4857 times
The Fragrant Garden
Category: bethie's world | Posted: Thu Mar 29, 2007 4:36 pm Well, I thought since we are all living and breathing gardening right now I would just take my camera and go for a meander in my yard. I am hot and heavy into scent gardening here. The very first good smell comes with the daffodils in February. 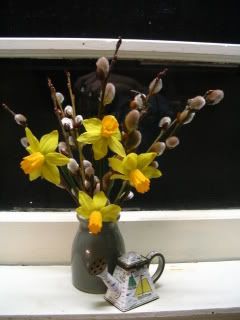
I grow many varieties even one that is scented like gardenias. I love pansies and violas that exude their sweet scent and beautify everything they touch. 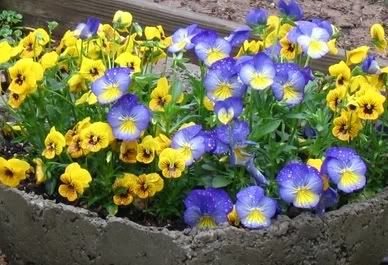
Hubby's fave is in bloom right now-Queen Fabiola. She has a very delicate light scent that gets right in your throat. 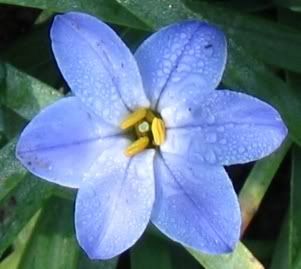
Everyone's favorite is the spicebush. A sprawling messy bush that blooms very early, is native to here and smells like cloves. He sends runners up and is good for sharing but must be transplanted very early. 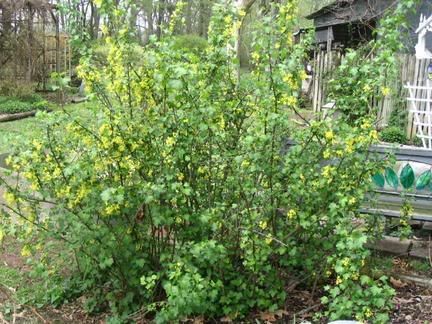
Hot on the heels of this is the native Carolina Allspice. 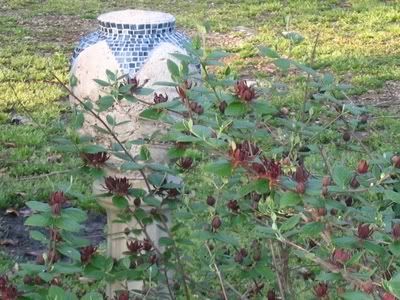
She is another sprawling shrub that is impervious to drought. Her blooms look like little waterlily's and smell like strawberries. On these warm spring days these can be smelled all over the yard. 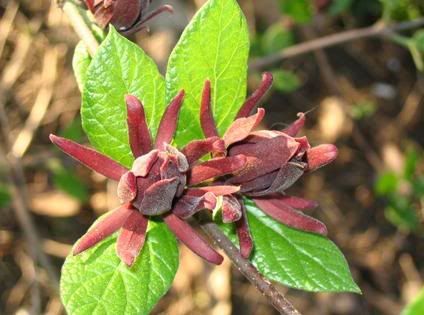
I love her so much I was able to find a chartreuse version that smells like oranges. 
The akebia vine aka choclate vine is also in bloom now. He's a 30 footer but very polite in habit. 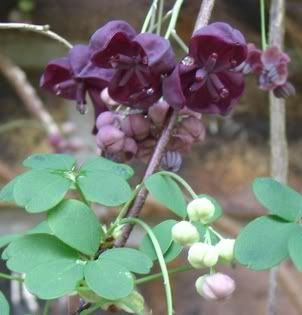
My poor sorry little lilac bush is in bloom also. 
Lilacs don't do well in this climate and mine is no exception. I am able to eke out a few great blooms though and I do love them. My magnolia vine, schizandra chinensis is finally starting to grow well. 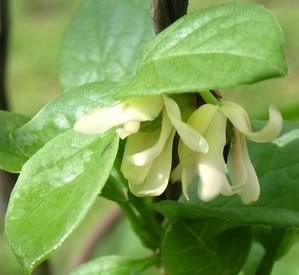
It's flowers are little and fragrant and this vine has many medicinal properties. Wallflowers are an easily grown biennial that blooms very early and is fragrant. They reseed easily. I start mine on August the first for bloom the next spring. This first one is not fully opened. They are the orangest! Try these. 
That's what's smelling up the place here. Then it's on to wisteria, lily of the valley and gardenia. Later in the summer it's cestrum nocturnum and autumn clemmie. She's a cloud of fragrant white. Of course I grow a lot of herbs too. If I could bottle this smell today I could be a millionaire-I guess I already am. Last edited: Thu Mar 29, 2007 7:38 pm This blog entry has been viewed 7639 times
Fairy house startup
Category: bethie's world | Posted: Wed Feb 28, 2007 5:17 pm Well, we started on our fairy house. I decided to go slightly Gothic with it. Hubby jumped right in to help. Once I had the dimensions he cut it out of exterior plywood and put it together with a light duty nail gun. This avoids wood splitting or having to predrill any holes. At the rooftip it is a whopping 41 inches tall. It will be completely grouted so it will be very weather resistant. The house has a bottom but then was placed on a concrete type board to have a little yard. The windows are thin wood. After grouting, the glass windows will be siliconed in place. 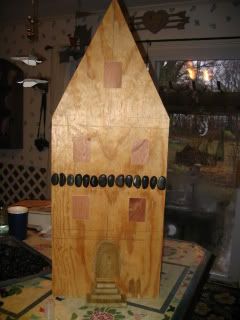
Now I am glueing river rocks to the front and then a very beautiful metallic glass. The grout will be gray. The steps are going an opaque green glass. The door I have hammered copper and put on with little copper nails. 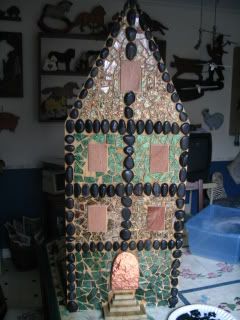
Here's some things for the house. 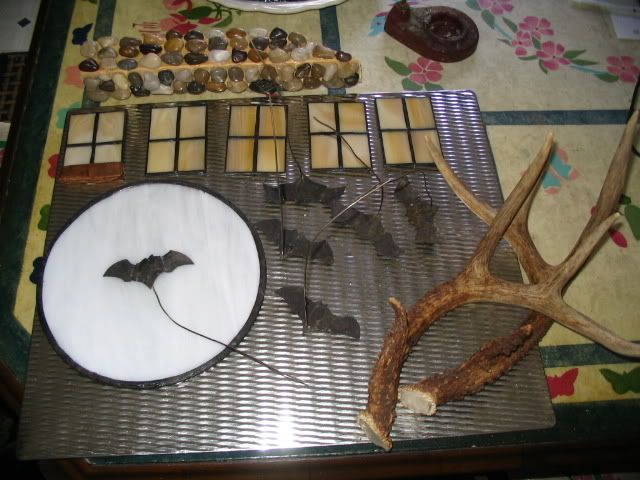
This moon attaches to the back of the house. I think Every house should have it's own moon. The rock piece is the house chimney. It has a hole drilled in the top that these little copper bats will fly out of in front of the moon. The antlers are going to be an arch over the front door with a little copper wire vine "growing" on it. The windows in the middle of the house have little copper boxes on them that another little vine will spill out of. That's it so far. It's a heavy piece that will be able to be viewed from all sides. I assume that fairies are not afraid of bats but it might keep those pesky GNOMES out. This blog entry has been viewed 2258 times
Fun with Gourds
Category: bethie's world | Posted: Thu Jan 11, 2007 5:20 pm Hubby got an unexpected Christmas bonus and put it right in my hot little hand and told me to spend it-so I did. We had grown gourds several years ago and they were all cured and piled up in the shop awaiting transformation. I got online and got me some gourd art supplies- some leather dyes and psanky egg dyes, an exacto tool set with a tiny saw blade, some oil based pastels etc. I LOVE art supplies. It rained all weekend for two weekends in a row so hubby cleaned up some gourds and we got started. My first one was the big gourd I put in the gallery then I switched gears and did some smaller ones. For all these gourds the pattern was put on in pencil and woodburned into the gourd. The gourd when finished is sprayed with a Krylon sealer. 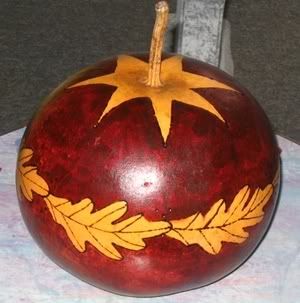
This is a burgundy leather dye. 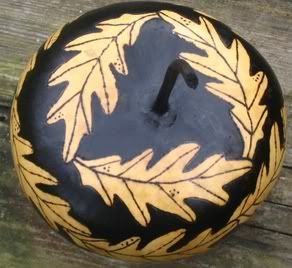
This is a black leather dye. Leather dyes are permanent and NOT skin friendly. I end up hugging the gourd when I am working on it so I had and old dress on to get ruined. I was in and out one morning working on a gourd and later that day was working on another and looked down and was wearing a good dress! When did I change my clothes? Since the dye was still wet I was able to pretreat it and get it out. Pay attention to what you're doing bethie. Get out of that gourd trance. Hubby in the meantime took the saw and did this lattice cutout on his first one. The top is also cutout and can be used as a stand if desired. Me Love. 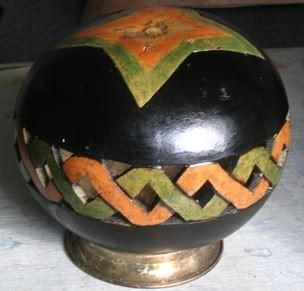
Then he did this small canteen gourd with a delicate egg design. 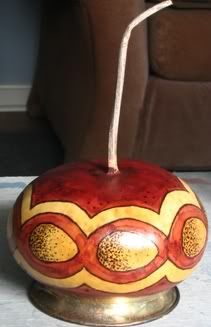
I made a repeating butterfly design into a potpourri bowl. 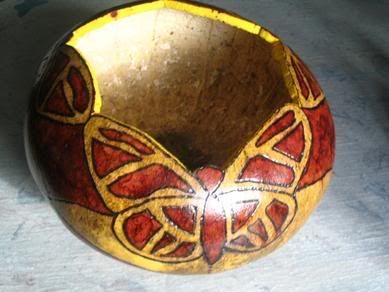
This morning glory design is colored with the pastels. 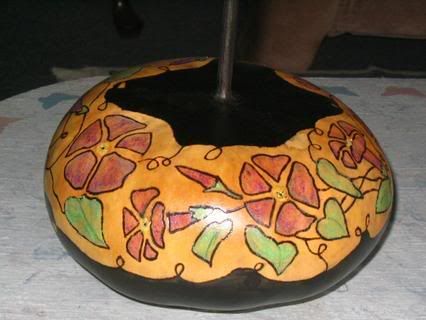
This apple gourd was hard as a rock and took forever to burn. 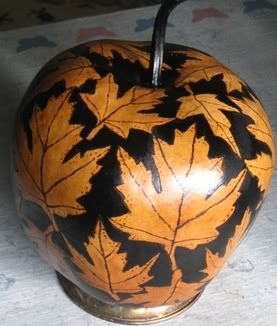
Hubby ended his gourd fun with some mushrooms, then I colored it for him with the egg dyes. 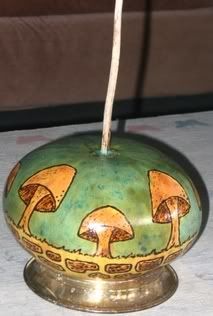
I love face art so I ended with a fun mask with cutout eyes and mouth. 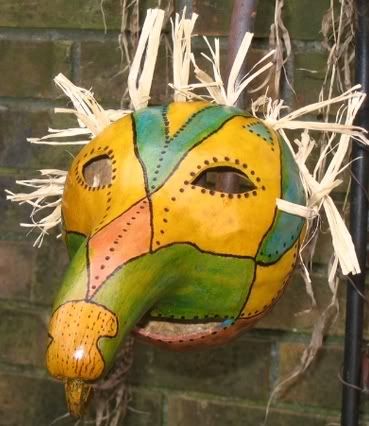
It's supposed to rain all this weekend too. Hmmmmm. This blog entry has been viewed 7530 times
You're reading one of many blogs on GardenStew.com.
Register for free and start your own blog today. |
Archives
All Entries |
