|
Recent Entries to this Blog
Project Tomato - It's Yummy
Posted: 25 Oct 2014 Posted: 03 Oct 2014 Posted: 23 Sep 2014 Posted: 19 Sep 2014 Posted: 07 Sep 2014 All Entries |
KK Ng's BlogProjects - All things new to me!
Sorting
Category: Aquaponics | Posted: Wed Feb 23, 2011 3:56 pm 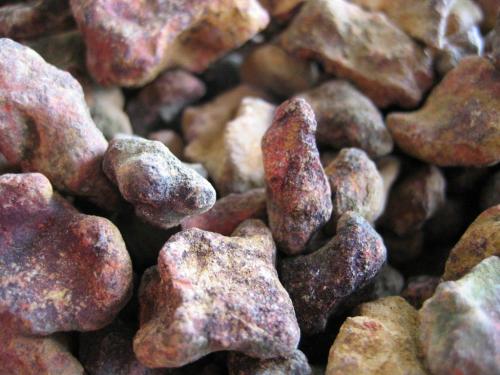
Pebbles ( photo / image / picture from KK Ng's Garden ) Been busy sorting out the pebbles into three different sizes - coarse, medium and small. Need to do this because I want the largest of the stones to be right at the bottom, then the mid-size and finally the small. I wanted this because it will act like a filter and passage of the water right at the bottom would not have restriction. 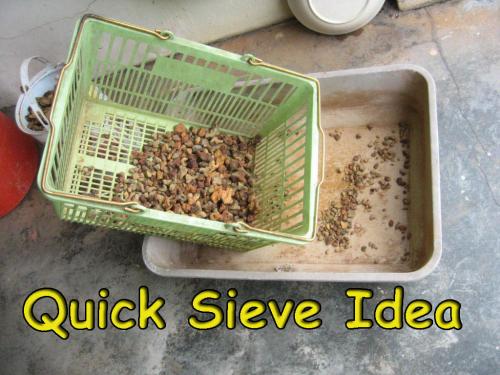
Quick Fix ( photo / image / picture from KK Ng's Garden ) The first stage is to pick out those that were larger than 4cm in size. The next size was between 2~4cm which I thought the old shopping basket would be a good candidate because of the varied size gaps on it. I was wrong because it was really difficult to make use of the 4cm gap. 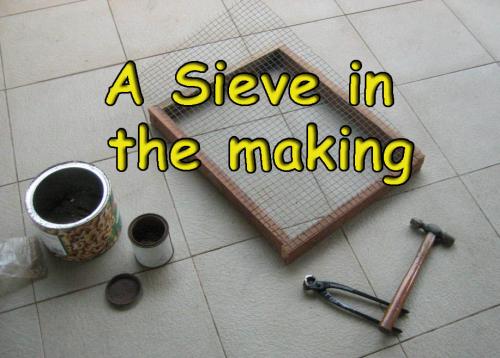
Sieve ( photo / image / picture from KK Ng's Garden ) After much suffering of trying to sieve the pebbles with a basket, I decided to make a proper sieve. After looking around here and there, I was lucky to find some old fencing that I used when I was romancing the romaine. The wooden frame was from part of the old bed that I found. 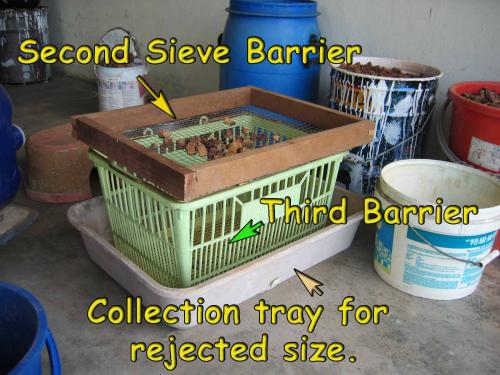
Systematic ( photo / image / picture from KK Ng's Garden ) With the proper sieve in place, sorting was much more pleasant. For those that were less than 1cm were used to fill up holes along the fence. Getting closer!! This blog entry has been viewed 624 times
Pebble Land
Category: Aquaponics | Posted: Sat Feb 19, 2011 3:26 pm After taking a survey around my yard, keeping in mind that the growing media must be easy draining, easy for the roots to anchor and neutral ph I guess. 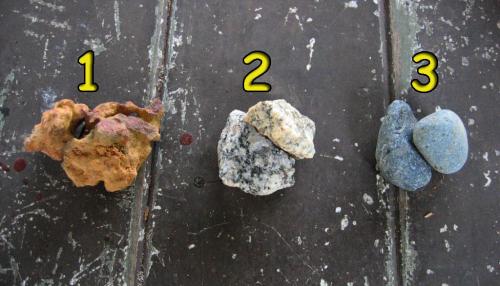
Grow Media Choices ( photo / image / picture from KK Ng's Garden ) The first one 1 is Laterite which is the most abundant around and it is free. Number 2 is Granite which was left over from the time I had the house renovated when I bought it. If I want to use it I guess I had to buy it. Number 3 is River pebbles, nice to see, nice to feel but it's expensive. I had some left over when I made my pond a couple of years ago. 
Pebble Land ( photo / image / picture from KK Ng's Garden ) Yes, laterite is the best choice for me and I know excatly where I can tons of it for free. Pebble land here I come! 
Ready to go! ( photo / image / picture from KK Ng's Garden ) I can get it in my yard but I do not want to leave a big hole in it, so with the necessary tools in my faithful Chariot I headed out to pebble land. It is just round the corner from my house. The weather was really hot and the sun was scorching when I arrived there. After circling around awhile I parked at a spot that I thought where the peebles look nicer. Got down and walk around for awhile to further inspect what peeble land had to offer. 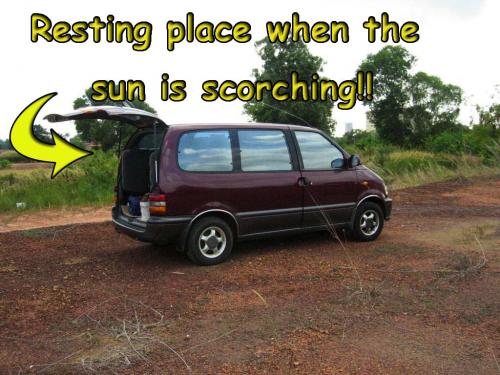
Rest Area! ( photo / image / picture from KK Ng's Garden ) It was really burning hot and I quickly headed back to my Chariot to shield myself from the sun. While shielded from the sun, I thought to myself that all the pebbles here are same and they were everywhere. Took out the shovel and wanted to gather the peebles that were shaded by the Chariot. Berfore I can start the sun was covered by passing clouds and I quickly decided that the pebbles over there looks nicer and straight away I headed there with the shovel to gather as much as I can before the sun reappear. Strange indeed, the grass always look greener on the other side. This blog entry has been viewed 813 times
LUCKY DAY!!
Category: Aquaponics | Posted: Thu Feb 17, 2011 2:11 pm After having all the components for the grow tank ready to be assembled, I did not proceed to assembling them. 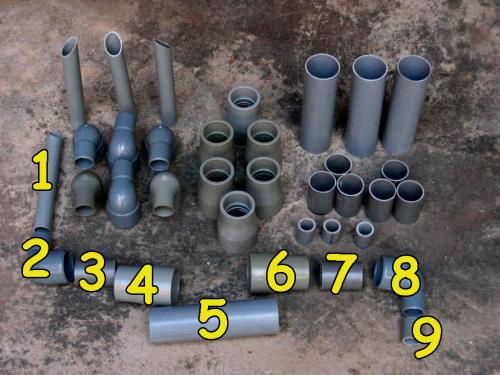
Components ( photo / image / picture from KK Ng's Garden ) The components from 1 to 4 is inside the grow tank and 5 is the connector to the outside connecting 6 to 9. The flexible tube is connected to 9 which has a smaller internal diameter than 9. This is necessary in order to bring about the Venturi effect thus starting the siphon. I did not proceed with the assembling because I was wondering what I should make use of in making the stand for the grow tanks, I can't have them on the floor because the return depends on gravity. I need to get the stand up also to visualise how the feed and drain plumping should be done. Checked my stash of lumbers but none were suitable so ........... for the last two days whenever I went out, I would keep an eye out for any discarded timber in any form which I could make use of. I was really reluctant to go to the timber yard to just buy a couple of foot run of the beams I needed because they would charge a exorbitant price for the transport or I had to wait at least a couple of days before they are delivered. So that was my last choice. Yesterday was my lucky day, while delivering some groceries to my mum-in-law's place, I saw what looks like a pile of discarded bed frame in the rubbish dump of a school which is just about 30yards from her place. I was delighted to see the lumber of the bed frame is still in great condition and on closer inspection, one of the legs had broken off. 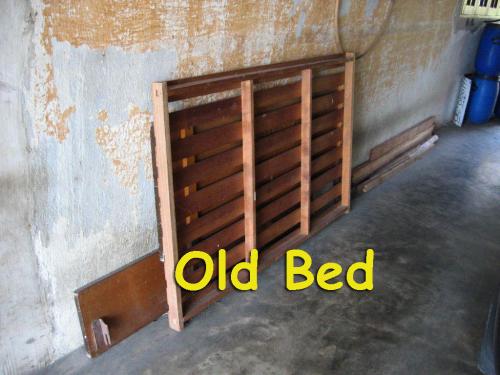
Old Bed ( photo / image / picture from KK Ng's Garden ) Piece by piece I took it to Becky's mum place for safe keeping because I had to return home to get the Old Chariot to transport my precious find. Becky's mum was surprised to see me taking the old bed frame into her compound because she just got someone to throw it out earlier. Looks like it is just a simple case of one person's rubbish is another person's treasure! 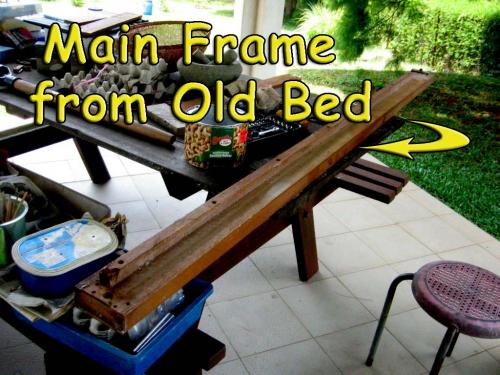
Recycling ( photo / image / picture from KK Ng's Garden ) This morning after having removed the unnecessary parts from the main frame of the bed and having it sawn to the required length, I was able to setup the layout of the system. Having anticipated the weight the racking had to bear, I decided to make use of the concrete blocks for the pillars and the wooden beams as the cross-member. I have no idea what the concrete blocks were for but every piece have a date on it and where they came from. They were left here by the previous occupant of the house I think. 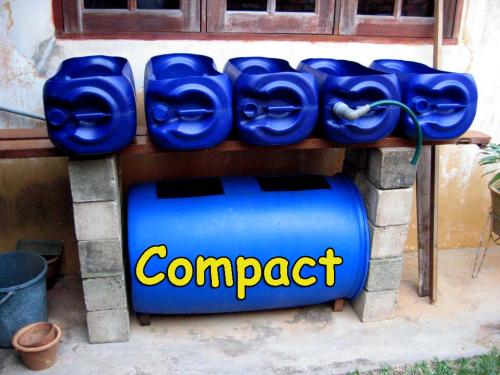
Compact Layout ( photo / image / picture from KK Ng's Garden ) The compact layout was my first thought but it did not look stable enough. Not having a center support for the cross-member also worried me because furniture wood is not exactly very strong. 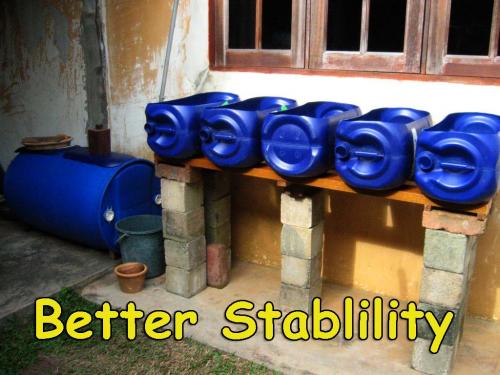
Acceptable Layout ( photo / image / picture from KK Ng's Garden ) This layout is much more stable and it is easier to work with the fish tank if need be. Since I have the space, I guess I'll stick with this layout. Cost of grow tank stand - $0.00 Next - GROW MEDIA This blog entry has been viewed 575 times
Shopping!
Category: Aquaponics | Posted: Fri Feb 11, 2011 3:16 pm This morning I finished opening up the last tank for the grow bed. 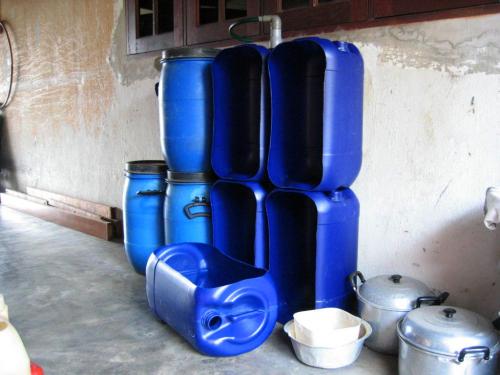
The Grow Tank ( photo / image / picture from KK Ng's Garden ) Guess what, my old quality hacksaw blade is still in one piece and is still ready to go on to the next sawing task! When come to hacksaw blades the best is a must or there'll definitely be lots of set back and frustration. 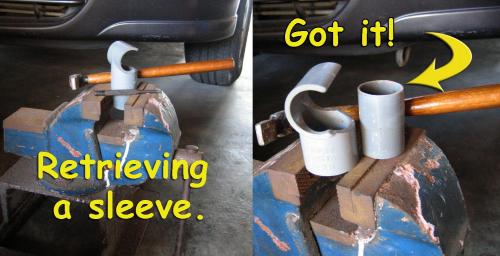
Retrieving Parts ( photo / image / picture from KK Ng's Garden ) Having done the grow tanks I started retrieving as much parts as I can to be reused. 
Garage Attic ( photo / image / picture from KK Ng's Garden ) The next place to check out is the garage attic where many things were stashed away and forgotten. Sometimes it is just a frustration when looking for something that isn't there but today it is a treasure chest for me cause there were some pvc pipes that I can use. 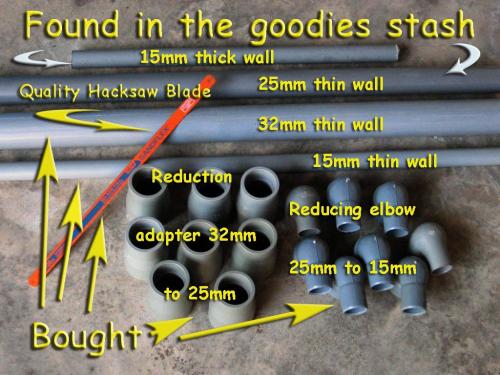
The Hardwares ( photo / image / picture from KK Ng's Garden ) Next is the shopping trip itself and I went to the largest plumbing hardware store in Malacca. I was disappointed that they do not carry the 32mm to 15mm elbow. According to them that is a rather a odd size and they don't think anyone manufacture it. If they don't have I guess it is pointless to go else where to look for it. Guess I had to stick with what I had done and make use of additional reduction adapter 32mm to 25mm. Next I guess would be the assembly and layout. OK the cost so far: 1 pc 200 litres Drum = $45.00 5 pcs 25 litres cans = $20.00 1 pc Funny Hand saw = $3.90 1 tube 300gm silicone sealant = $6.00 8 pcs Reduction Adapter 32 to 25mm = $5.60 8 pcs Reduction Elbow 25 to 15mm = $4.80 1 meter 32mm pvc thin wall pipe = $2.50 1 meter 15mm pvc thin wall pipe = $1.50 1 pc best quality hacksaw blade = $3.80 Last edited: Fri Feb 11, 2011 3:31 pm This blog entry has been viewed 734 times
Itching
Category: Aquaponics | Posted: Tue Feb 08, 2011 3:45 pm Last Sunday I was really itching to setup the grow bed to check whether it is possible to make use of the exsisting hole or not even though I am not sure I have the hardwares or not. After sending the children to the bus station for their return to their respective college/university, I decided to just cut open one of the drums for the grow bed to see how it is. 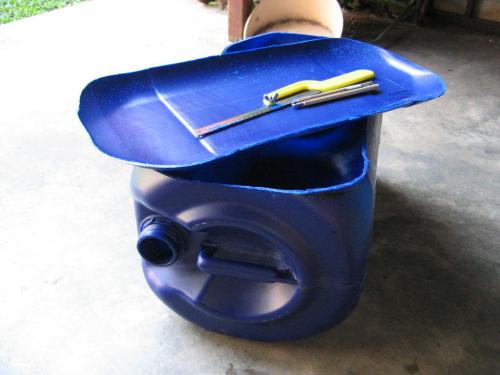
Grow Bed ( photo / image / picture from KK Ng's Garden ) Got the drum opened as plan and it was quite easy after getting some experience opening the big drum for the fish tank. Incidentally, the 2 pieces of hack saw broke while I was cutting the fish tank, they were really brittle and snap real easy. I took the blade from my hack saw and used it ..... have to make a note to get another for spare. After having done that, there was about another two hours to dinner and not wanting to do weeding, I started going through my old stuffs to look for pipe fitting. I guess the itching was too great to be supressed. After digging around for awhile, I found my old surf-casting fishing rod holder which I made from pipe fittings and broom handle. Since I had not gone fishing for a very long while now I decided to dismantle it and make use of the parts together with whatever left over pvc pipes and fittings I had collected over the years from my house maintenance. 
Perfect ( photo / image / picture from KK Ng's Garden ) Luck was with me cause there was a short section of the 42mm dia. pipe, cut of the broken end and got a lenght that should be ideal. The fit was perfect, I have to tap it in quite a bit. 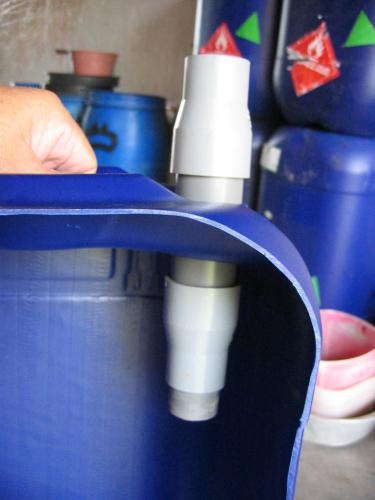
Fitted with reduction adapter ( photo / image / picture from KK Ng's Garden ) I did not have reduction elbow of the right size so I have to make use of reduction joint before the reduction elbow. 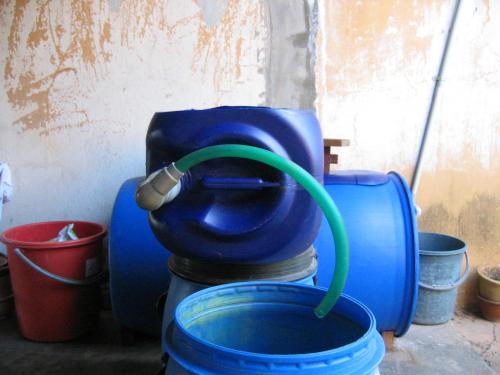
Unexpected design ( photo / image / picture from KK Ng's Garden ) I tried making use of the design that I thought of earlier but was unable to do so cause it was either unworkable or there was not enough hardware. I decided to do a quick fix and make use of a section of my old PVC flexible hose. 
It Worked!!!!!! ( photo / image / picture from KK Ng's Garden ) HEY!!! IT WORKED!!! Not only it worked, it worked real well. I guess making use of flexible hose would be more flexible for me to set up the reurn piping. 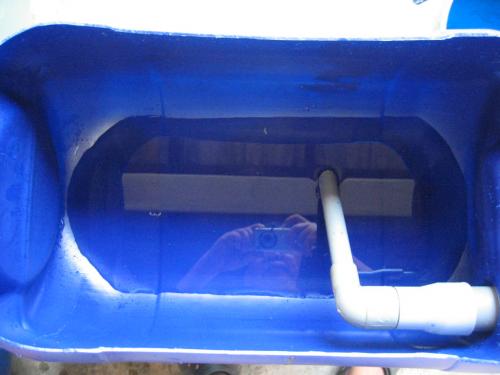
Inside setup ( photo / image / picture from KK Ng's Garden ) This is the remaining water from the backwash when the siphon was broken. I guess it is a acceptable amount of water left over. Now to make a shopping list to get all the grow beds fitted so that I can get on with setting up the water feed and return piping. This blog entry has been viewed 2085 times
Next, Lend Me Your Minds
Category: Aquaponics | Posted: Fri Feb 04, 2011 3:21 pm With the fish tank safely secured and in place, I am now into the grow beds. At first I thought that it is going to be easy until I take a closer look at the barrels that are going to converted to be the grow beds. So please lend me your minds. 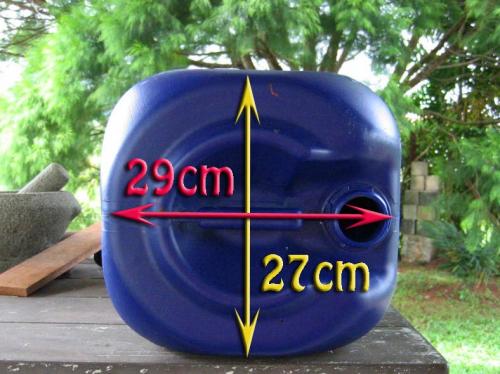
Stable side ( photo / image / picture from KK Ng's Garden ) After rolling the barrel around , I found that laying it this way is the most stable. The 27cm height is more than enough for the grow bed. Laying it down this way means the opening hole will be just at 50% of the height and might be a problem for siphoning out all the water. 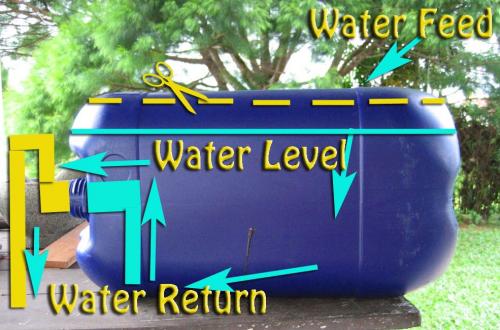
Concept ( photo / image / picture from KK Ng's Garden ) This is the concept and it looks simple enough but as I look at it more in detail, it becomes more complicated. Initially I thought of using the Bell Siphon and I changed my mind because it takes up space in the grow bed. Moreover I do not want to make any hole in the grow tank because more holes means more chances of leaking. Since there is already a hole I'll make use of it the best way I can. To make use of the existing hole, I'll have to make use of the Loop Siphon which I think is possible to incorporate into the design but what would be workable and most efficient. 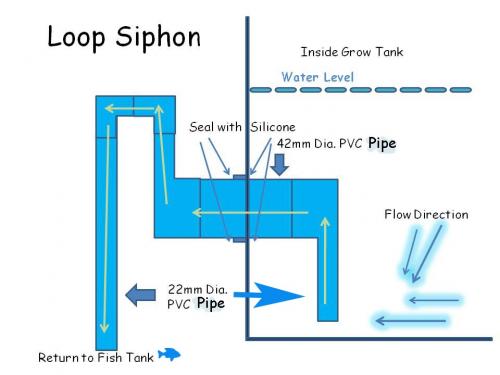
Design 1 ( photo / image / picture from KK Ng's Garden ) In this design, I am not sure wether the water in the 42mm chamber would be drained out or not. I have to make use of 42mm dia piping because the existing hole can fit a 42mm dia pipe snugly. 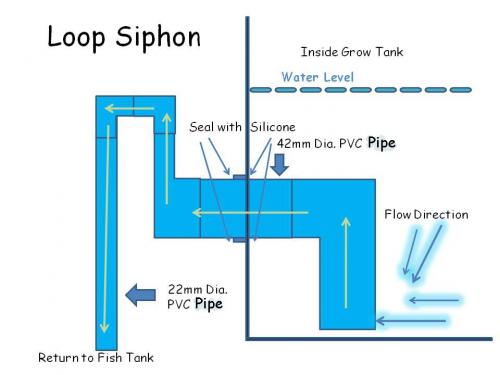
Design 2 ( photo / image / picture from KK Ng's Garden ) This might work but ....... 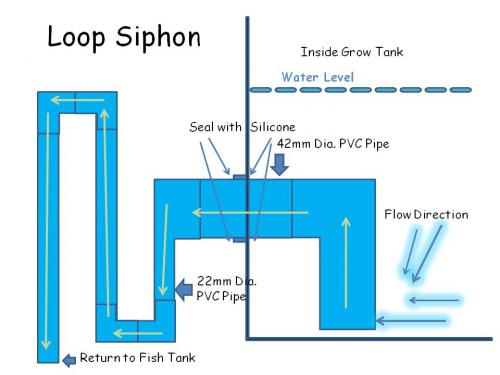
Design 3 ( photo / image / picture from KK Ng's Garden ) This will work but I think the water in the first section of the 42mm pipe will back flow into the grow bed. 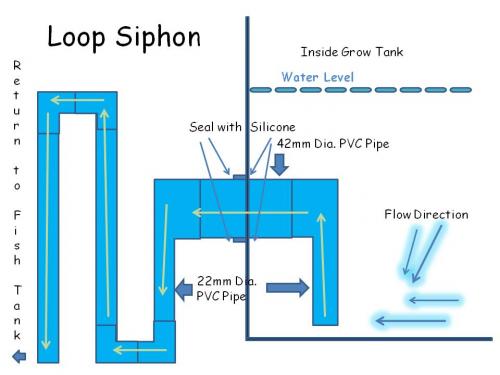
Design 4 ( photo / image / picture from KK Ng's Garden ) I like this and I think it will work. Well..... Wanted to try it out physically but all the hardware shops are closed for the Chinese New Year break. Guess I had to wait for next week! GONG XI FATT CAI This blog entry has been viewed 603 times
Wedgies
Category: Aquaponics | Posted: Thu Feb 03, 2011 1:55 am Before starting on the wedgies, thanks to rain I am able to collect more than enough water to fill up the tank to the max. 
Stress Test ( photo / image / picture from KK Ng's Garden ) After having it filled, I can now very confidently say that the stress at the opening is minimal if any and 100% no leak at the screw cap holes or any other part of the tank. I tried rolling the tank but it need lots of effort so there is indeed a need for some kind of stopper. After consideration, decided on the wedgies .... as Sojerd said it "THE best idea in terms of cost and simplicity." 
Old Timber ( photo / image / picture from KK Ng's Garden ) Found a piece of left over very hard wood beam which was used in the renovation of my house about 20 years ago and so no extra cost but high value! 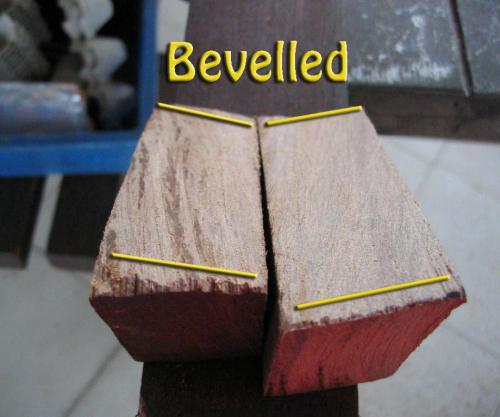
Accidental Beveled ( photo / image / picture from KK Ng's Garden ) This species of wood is rated as the second most hard wood from the tropical rain forest. If any termites dare to take a bite at it, I am sure they will have to go see a dentist after that!! Having not saw a piece of hardwood for a long time and with my glasses on for the first time, the end result is a beveled edge instead of a true 90ú flat face. A contoured or concave face would be great but due to my laziness ........ 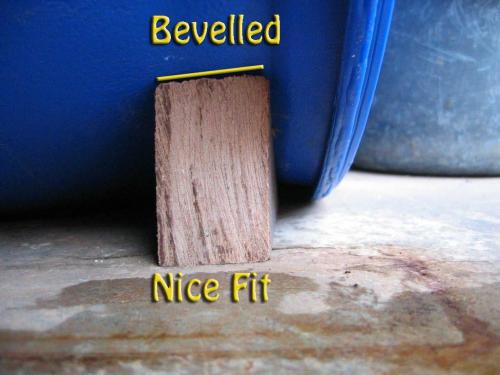
Accidental Benefit ( photo / image / picture from KK Ng's Garden ) Anyway this error actually worked in my favor because of the sloping part of the wedgies actually fit nicely to the tank. With a little tap the wedgies fitted snugly into position and it is almost impossible to remove it after that. 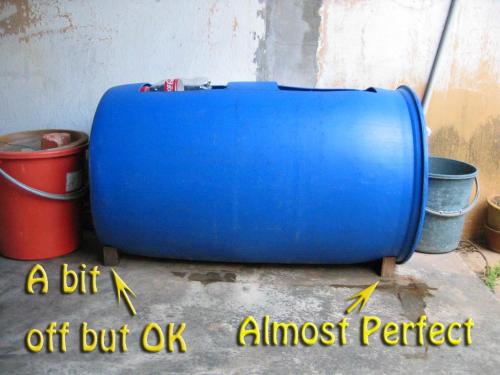
Neat ( photo / image / picture from KK Ng's Garden ) Well Jerry, it is the barrel against the wall with a couple of wedges. It is really stable and neat. This blog entry has been viewed 694 times
Anti-Roll
Category: Aquaponics | Posted: Sat Jan 29, 2011 4:06 pm Jerry suggested that I should have some kind of barrel support so that it would not move ....... I have been looking at it but wasn't really able to decide. After sitting down infront of the barrel and starring at it off and on for about two days, these are my thoughts. 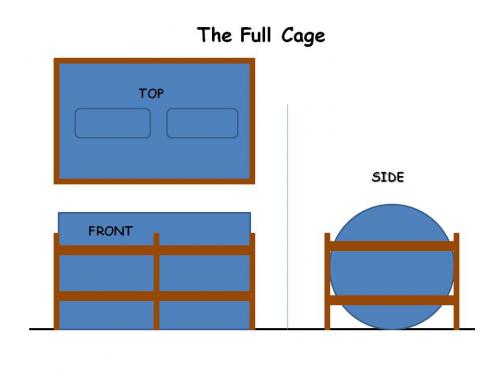
Full Cage ( photo / image / picture from KK Ng's Garden ) This look very secure but ..... err is this like over doing it? 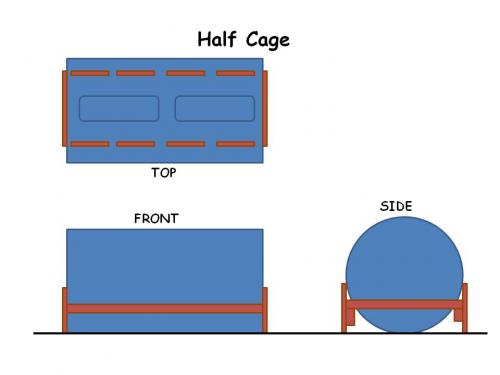
Half Cage ( photo / image / picture from KK Ng's Garden ) I guess this might be a better solution because the cage is not at a tangent to the circumference of the barrel so it actually stop it from moving I think. 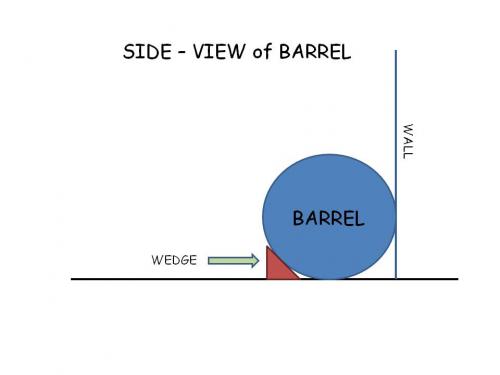
The Wedge ( photo / image / picture from KK Ng's Garden ) The most simple form just like a car wheel stopper used when changing a flat tyre. Everytime I try to think for more solution the wedge always come to my mind. I think this is the best because it is simple to move and simple to apply. The cost is minimal. Anyway it is raining again now and I would be able to fill up the barrel tomorrow with the water I am collecting now. With a fully filled up tank I would be able to see how the wedges perform in real situation. Tomorrow WEDGEY day!!! This blog entry has been viewed 1860 times
I'm Pleased ....
Category: Aquaponics | Posted: Thu Jan 27, 2011 2:44 pm By noon today, the silicone sealant would have cured for more than 24 hours. 
50% full of rain water ( photo / image / picture from KK Ng's Garden ) Filled it with the rain water collected yesterday and managed to fill up 50% of the capacity. 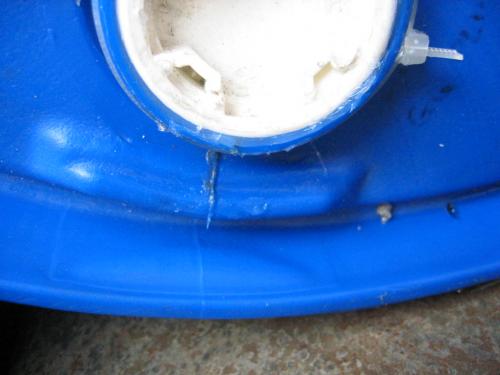
No Leaks ( photo / image / picture from KK Ng's Garden ) Check out my handy work and there is no leak. Turn the drum around so that the other hole is checked too to ease my my mind that it is OK too. yes it is OK and is keeping my fingers crossed because this is just initial. 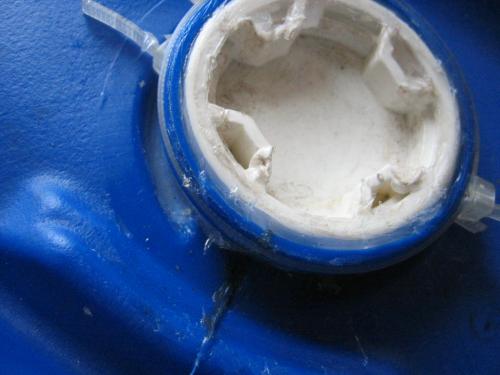
6 hours later ( photo / image / picture from KK Ng's Garden ) 6 hours later after my lunch, afternoon beauty sleep and weeding about in the mini farm, I was a bit nervous while keeping my fingers crossed as I approached the half filled tank. Hey it is as dry as a bone ..... I did it. I am pleased ....... This blog entry has been viewed 1848 times
It's Open!!
Category: Aquaponics | Posted: Wed Jan 26, 2011 4:09 pm Yesterday lost all my photos in my alzheimer suffering camera but early this morning I was rewarded with sky juice fresh from the sky. 
Sky Juice ( photo / image / picture from KK Ng's Garden ) It had not rained for more than 2 weeks now so it is indeed pleasant to have it but it overstayed it's welcome and it is still drizzling now ...... almost midnight now. Anyway the timing couldn't be better because tomorrow I would need the water to test out if it is still leaking after redoing the leaking area yesterday evening. 
Double Secure ( photo / image / picture from KK Ng's Garden ) This time instead of one cable tie, I used two - one at the base and another at the rim. This was done after the drum was cut. 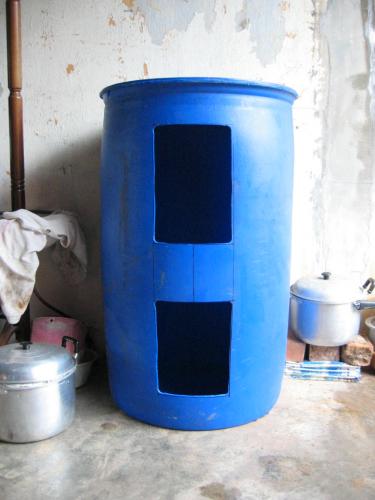
It's Open ( photo / image / picture from KK Ng's Garden ) The design for the opening was changed after Jerry made some very important comments on my last posting. Thanks Jerry, I think the band in the center should be strong enough, if it is not I guess I'll have to reinforce it. 
Inside View ( photo / image / picture from KK Ng's Garden ) The inside of the access hole is not flat so I am not able to sealed it with a gasket. The best way I know how is to silicone it. I did it for both the access holes practising better safe than sorry. The silicone curing time is 24hours and since it had been raining and raining the whole day today, I decided to let it stand for another day before proceeding to do the leak test. The drum is made in Germany and I guess it had to meet with some kind of standard in relation to the welded part of the top cover. Knowing that the drum is made in Germany gives me more confident that the top cover would stay in place. The tear at the access hole must be caused by over tightening of the screw cap. The O-ring for that cap is missing and I had to use excessive force to open it when I got it. Keeping my fingers crossed for the moment of truth!! This blog entry has been viewed 564 times
You're reading one of many blogs on GardenStew.com.
Register for free and start your own blog today. |
|
