|
Recent Entries to this Blog
Project Tomato - It's Yummy
Posted: 25 Oct 2014 Posted: 03 Oct 2014 Posted: 23 Sep 2014 Posted: 19 Sep 2014 Posted: 07 Sep 2014 All Entries |
KK Ng's BlogProjects - All things new to me!
The Crucial Cut ........
Category: Aquaponics | Posted: Sat Jan 22, 2011 2:17 pm I did a leak test on the 200litres drum and found one of the access hole is leaking. 
( photo / image / picture from KK Ng's Garden ) There was a crak at the joint of the moulding of the drum due to excessive forced used to shut the stopper. I repaired it from the outside with silicone rubber and kept my fingers crossed that the job is done. I did another leak test this morning and ...... arrghh!!!! water is still trickling out. On closer examination I concluded that the sealing must be done both on the inside and outside. In order to reach the area that is having the leak from inside I'll first have to make an opening large enough for my hand to get in. Since I have to make an opening for the fish to go into, I guess I might decide where the opening should be to convert this drum to a fish tank. 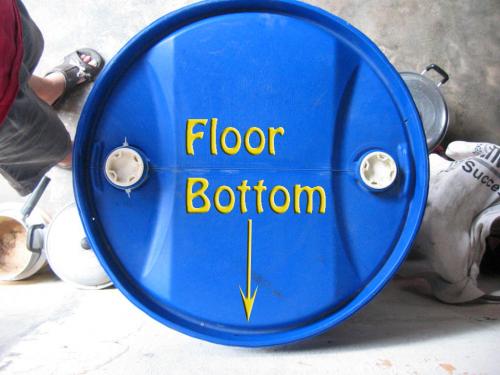
On the Floor Position ( photo / image / picture from KK Ng's Garden ) The drum will be placed on the floor in this position(it is now against the wall) with the two opening parallel to the floor. I feel that this is the best arrangement because should any one of the screw on caps (the white things) decide to leak while in operation, at least half of the water would be retained. I do not need any drain hole so I see no reason to have one right at the bottom. What do you think? 
Minimised Cutting ( photo / image / picture from KK Ng's Garden ) This is how I am going to make the opening at the side of the drum and when it is lying down on the floor it would be facing up. I am thinking of 15cm wide and if it is not wide enough, the maximun I would go is 30cm. I want a small opening enough for me to put my hand in to do work like sealing the leaks for starters, pump placement and off course catching the fish for the dinner table when it's time ... hehe!!! A small opening would also mean less water loss due to evaporation and more difficult for the fish to jump out to go for a walk!!! I hope I had covered all different aspect for the conversion from drum to fish tank before I make the crucial cut. OK the expected cost so far: 1 pc 200 litres Drum = $45.00 5 pcs 25 litres cans = $20.00 1 pc Funny Hand saw = $3.90 1 tube 300gm silicone sealant = $6.00 1 pc 600litres/hr submersible pump = ? PVC pipes and fittings = ? This blog entry has been viewed 633 times
Zee Tool
Category: Aquaponics | Posted: Fri Jan 21, 2011 3:45 pm 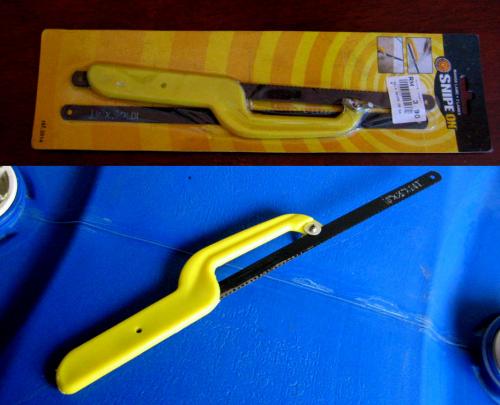
Very Simple Tool ( photo / image / picture from KK Ng's Garden ) This is the tool that I mentioned earlier and I found it in a unique bargain store with a unique name - Super Cowboy. The yellow part is the handle and it is made of plastic. The black blade is a piece of hacksaw blade and it goes into the handle. The lenght of the exposed part of the blade can be adjusted by losening the wing nut at the end of the handle. I got it yesterday and on the way back home I had to drop by at my mum's place to answer plumbing emergency call. Her plastic stop cock head broke and water was gushing. With the new tool in hand I used it to saw the PVC pipe and had the stop cock replaced. It worked and it is real cheap!! OK the expected cost so far: 1 pc 200 litres Drum = $45 5 pcs 25 litres cans = $20 I pc Funny Hand saw = $3.90 1 pc 600litres/hr submersible pump = ? PVC pipes and fittings = ? This blog entry has been viewed 527 times
Committed
Category: Aquaponics | Posted: Tue Jan 18, 2011 3:38 pm Went to the scrape yard and got myself committed this morning, it is getting real exciting. 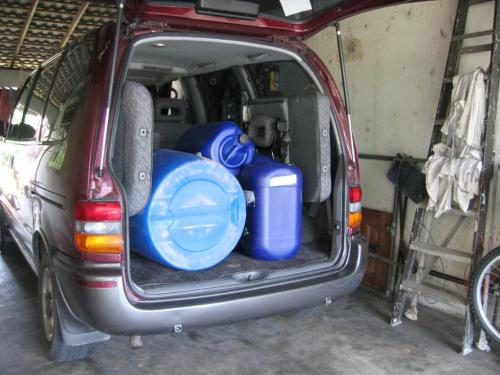
The commitment ( photo / image / picture from KK Ng's Garden ) Those drums filled up the Old Chariot. 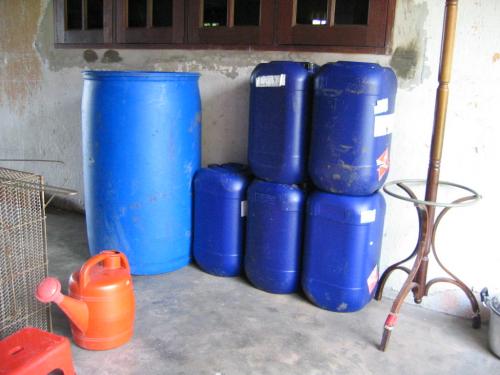
The Hardware ( photo / image / picture from KK Ng's Garden ) I have no idea what the content of the 200litres drum was but it didn't have any foul smell and it is really clean inside. The 25litres drums were used for orang and apple cordials...... they smell pleasant. It is nice to see the hardwares physically as it really take away lots of the guessing work. I laid them out on the area that they were supposed to be and they fitted well. Now I have to start looking for lumber for the racks to support the grow bed and keep the 200litres drum in place. Next I'll have to modify the drums so that they are useable for the purpose. I have never modify a plastic drum before so I am wondering what would the best tool to cut it. A powered jig saw .... good choice but mine is broken, a blade???? These are heavy duty drums so i guess a blade is out of the question. I guess my best choice now is to Google it. This blog entry has been viewed 665 times
Design & Technicalities.
Category: Aquaponics | Posted: Wed Jan 12, 2011 2:42 pm For the design, I am keeping it as simple as possible. 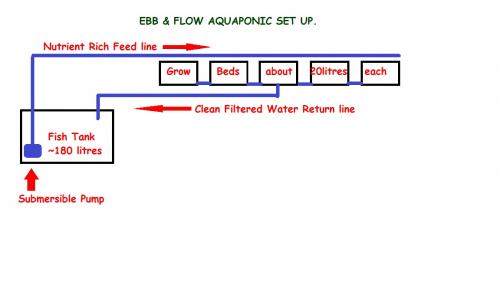
The Design ( photo / image / picture from KK Ng's Garden ) The design looks simple enough and I am sure you are aware that putting the design on paper is simple but building it is whole lot of different story. I am keeping my fingers crossed that I would not have much obstacle when I start on it physically. Now for the technicalities, I will be following most of the information from the College of Tropical Agriculture and Human Resources, Universiti of Hawaii at Manoa in the internet and whatever useful information I can get from any website. The Maths The 200 litres drum for the fish need some modification work because I will be lying it on the ground. The drum need to be cut along it's side so that there is an opening. After this modification, I would expect to at least contain 180litres of water. According to most website, to have healthy fish, the total volume of the water need to be filtered every hour which means I have to have a pump capable to move at least 180litres per hour. My plan is a 400litres per hour pump, always more is better than not enough. As for the grow bed, the containers should be flooded every 15~20 minutes and an automated draining system is needed. To ensure that the grow beds are flooded within 15~20 minutes, the pump must be able to top up 100 litres (Since the are 5 20litres grow bed - 5X20=100) during that time. Oops I think the pump capacity is just enough and I am not comfortable with that. 400 litres per hour pump will provide a volume of 100 litres theoretically in 15 minutes. So the pump must have a larger capacity, at 600 litres I guess. To drain the water after flooding, I think I'll go with the bell siphon system http://www.siphons.com/operation.html of it's efficiency instead of the loop siphon system.http://www.youtube.com/watch?v=lf4GYqhedTw Frankly I have not really make up my mind yet ..... will see how it get along ya!! OK the expected cost so far: 1 pc 200 litres Drum = $45 5 pcs 25 litres cans = $20 1 pc 600litres/hr submersible pump = ? PVC pipes and fittings = ? Last edited: Wed Jan 12, 2011 2:45 pm This blog entry has been viewed 597 times
A Visit to the Scrap Yard
Category: Aquaponics | Posted: Tue Jan 11, 2011 1:44 pm Yesterday morning I made a visit to the scrap yard to dispose of my couple of months collection of recycleable scraps. It was a good trip and I am happy with the items they have that I can make use for the aquaponics. 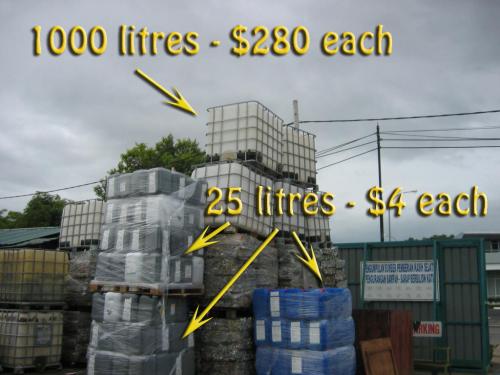
Very Large and Very Small ( photo / image / picture from KK Ng's Garden ) The 1000 litres tank is superb and at $280 per piece, is OK with me. A new tank of approximately the same capacity made of fiber glass will set me back by $800 which I will never pay for it. With the $280 one I can cut about 1foot off from the top and I'll get two open top tanks, one about 3 feet deep which I can use for the aquaculture while the other is about a foot deep which will be ideal for the hydroponics or veggies growth bed. The smaller 25litres tanks at $4 would be great for additional veggie growth bed without eating a hole into the pocket. There is a problem here because I do not have the transportation to transport the tank back to my home. To arrange for hire transportation would be a hassle and I do not wish to go through that. Then a bell rang in my mind that I should actually be looking at sizes that are more portable for me to move around by myself since I might have to change the location. Moreover there are many uncertainities so I guess a smaller set up would be safer. 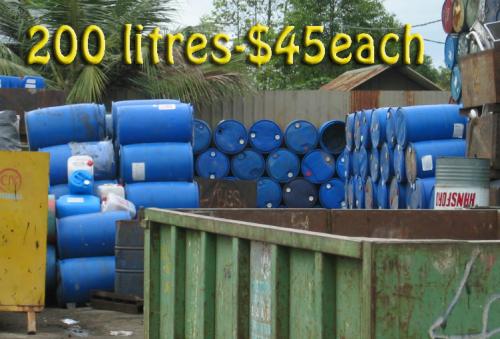
The Ideal Size ( photo / image / picture from KK Ng's Garden ) These 200litres tanks is just ideal and the price at $45 I think is a steal. I have a couple of these smaller size drums at home and they do not deteriorate in the sun, maybe super slowly. To transport these 200litres drum is no problem for me. For the grow beds to go with this 200litres drums, I'll make use of the 25litres containers, maybe 4 or 5 of them. I guess this is the most ideal set up for start up and if the project works out to be relly fun then I can easily expand it base on this set up. Now to the drawing board to work out the technicalities set up design with these available hardware. Last edited: Tue Jan 11, 2011 1:50 pm This blog entry has been viewed 2133 times
A Step Forward
Category: Aquaponics | Posted: Sat Jan 08, 2011 3:05 pm The location would be on the north east portion of my home and if it is not conducive I would have it moved to another location. I decided on this area because it would not be too hot on a real hot day and since I want to plant veggies like lettuce, romaines, leeks, strawberries ........... I guess the morning sun and the not too hot environment is preferred. 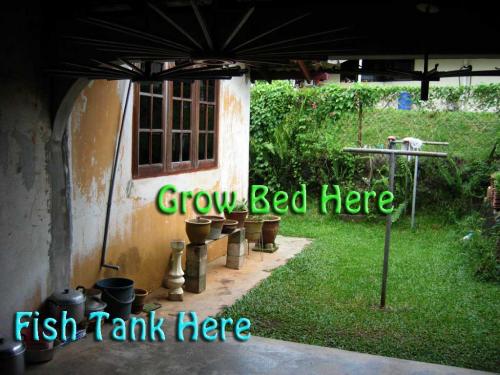
1st Location ( photo / image / picture from KK Ng's Garden ) The fish tank would be located where those old cooking pots are, I am using them to store earth and compost for potting. There is hardly any sunshine here so I do not have to deal with unwanted algae growth and I guess the fish will be more comfortable in cool environment. The grow beds will be located under the windows where they will get the maximun amount of morning to noon sunshine. The plants that I have there now are scallion, sage, sleeping bay leaf and rosemary. The set up have to be able to be moved if need be because the location might not be suitable and since this is my first time, I guess I had to go on with a comfortable size that I can handle. If all goes well, then there can always be the expansion program â˺ This blog entry has been viewed 2085 times
Decisions, decisions, decisions.........
Category: Aquaponics | Posted: Wed Jan 05, 2011 2:02 pm Took a slow walk around my house today to decide where should I locate this aquaponics project. Never knew that it is so difficult to decide where would be a good spot. My house is sitting on a almost rectangular piece of land facing south. The backyard is small after having the kitchen extended. From wall to fence is about 15feet and it gets sunshine almost the whole day. It would be great if I can make use of this space which is about 40 plus feet long but beyond the fence is a family of brainless, filthy, inconsiderate, @#$%&*$#@ thing. They use weed killers to kill the weeds along the fence with no consideration to the neighbours plants and had their dog jailed in a very small prison cell 24/7, not to mention their rubbish.....yucks!!!! So I guess the backyard is out of the question unless I want another unpleasant incident. Looking from the front portion of the house, east is on the right and west on the left. The east side from the front side all along the front gate to the house is the drive way and thereafter is the car porch area which extend almost to the back of the house. Here I get about 3~4 hours of morning sunshine because of the close proximity of the neighbour on this side. On the west side, the morning sun is shaded by my house and only the mid-day to evening sun is available here. Mid-day sun is scorching almost every sunny day and I used to have some potted plants there and they did not grow well due to the pots getting heated up. Hmmm.... if I can keep the temperature of the water in aquaponic cool maybe I can counter this problem. The front yard, there is lots of space but lots of finance is required ..... sheds, plumbing and electrical wiring. Tough, tough, tough ..... need to decide soon so that I can get to the setup plans next. The west side???????? Last edited: Wed Jan 05, 2011 2:04 pm This blog entry has been viewed 2187 times
The Bug
Category: Aquaponics | Posted: Tue Jan 04, 2011 2:05 pm Ever since Masket introduced me to aquaponics, I had been doing lots of reading about this form of gardening. OK I guess I am in a way bittened by the aquaponics bug and the word aquaponics is sure to cross my mind at least acouple of time a day. Now I am researching on the hardwares and softwares before I start on the plans. My guidelines are: ... minimal set up cost ... minimal operating cost ... maximum output ... 100% organic ... enviromental friendly I have no experience at all in this area and I will appreciate all tips and guidance. I am keeping my fingers crossed that my first pilot setup will be operational by March this year. This blog entry has been viewed 2095 times
You're reading one of many blogs on GardenStew.com.
Register for free and start your own blog today. |
|
