|
Recent Entries to this Blog
Project Tomato - It's Yummy
Posted: 25 Oct 2014 Posted: 03 Oct 2014 Posted: 23 Sep 2014 Posted: 19 Sep 2014 Posted: 07 Sep 2014 All Entries |
KK Ng's BlogProjects - All things new to me!
Let the planting begin!!
Category: Aquaponics | Posted: Thu Apr 21, 2011 3:59 pm Got the talapias in on March 23 and the got down to work immediately. 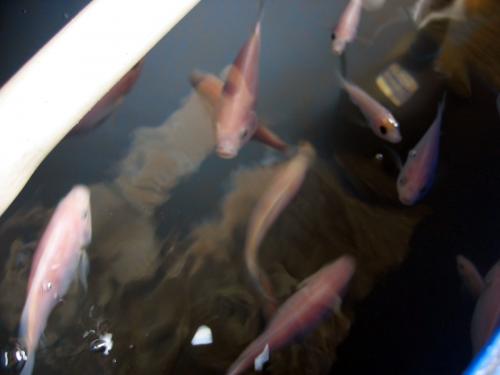
Talapias ( photo / image / picture from KK Ng's Garden ) These fellas are growing real fast, more than four times the size when I got them. I feed them with commercial fish pellets and lettuce leaf once in a while. Still looking for duck weeds inactively anyway they are keeping the tank real clean from algae. 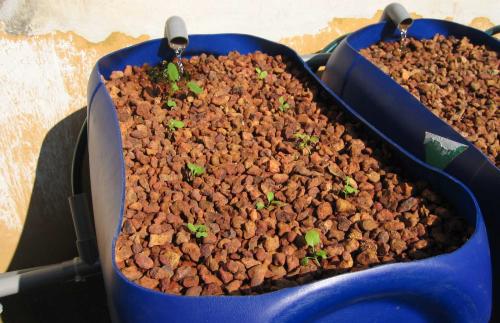
First Batch ( photo / image / picture from KK Ng's Garden ) These are the first batch of seedlings which is what Marlingardener would call "Orphans Plants" except for the one on the far right corner which is a lettuce. I wanted to start with lettuce but I only got a single seedling from the 20 seeds that I germinated. I hate waiting, don't you? As a matter of fact from what I had read, I am suppose to wait like 2 or 3 months to let the bacteria grow to produce the necessary nutrients but I couldn't wait. Now is to watch how this first batch of veggies is going to grow. I have four more beds ...... maybe I'll start more seeds tomorrow!!! This blog entry has been viewed 1684 times
All System Go!!
Category: Aquaponics | Posted: Tue Mar 15, 2011 3:57 pm After ironing out all the problems (I hope!) I had the fish tank filled out to the brim. 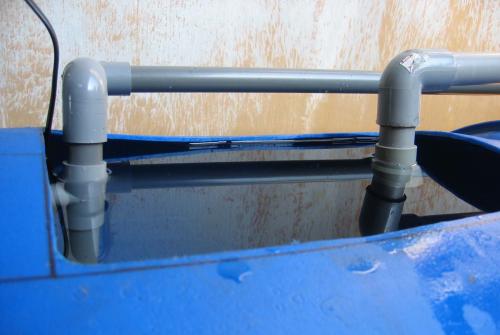
Filled to the brim ( photo / image / picture from KK Ng's Garden ) I made sure that all the water in the grow tanks were siphoned out before filling in the fish tank. In this way I am able to determine how much water is left in the fish when all the grow tanks were filled. 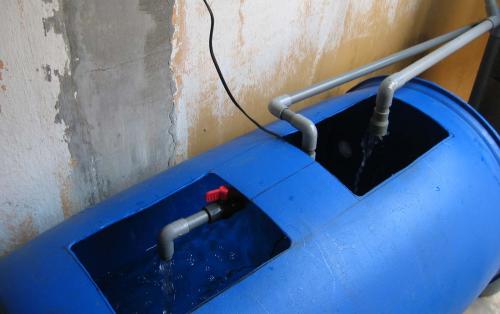
Water level after filled grow tank ( photo / image / picture from KK Ng's Garden ) The water level is about 6 inches or 16cm below the brim, That is a comfortable level to work with and I think if I were to add one more grow tank, it would be no problem. 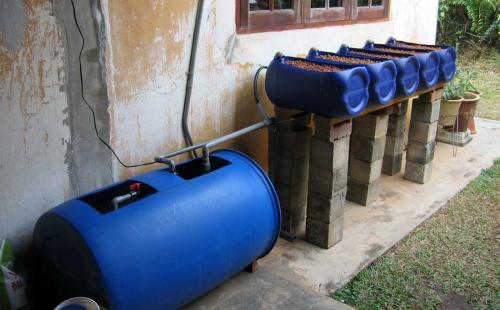
All system go!! ( photo / image / picture from KK Ng's Garden ) After feeling everything is running smoothly, I started with the cycle time adjustment. The best time I could get is about 11 to 13 minutes, any slower the siphon will not start. I guess I just had to work with that even thought I mentioned theoretically is 15~20 minutes. Would a couple of minutes make a difference?? Hmmm ... Well the only way to find out is when the planting start and I am OK with that. I had also inoculated the water with some water from my fountain so that the maturity of the water can be shorten. And I the final cost: Total Hardware purchase: $175.00 Old parts cost estimate: $25.00 Total Cost : $200.00 I guess $200.00 is reasonable and I am sure once it is productive, it should pay back in less than 6 months. Next, should I get edible fish of just fish, buy or go fishing? This blog entry has been viewed 1884 times
Problems and headaches!!
Category: Aquaponics | Posted: Sat Mar 12, 2011 4:26 pm After sleeping on the flow problem I came up with a simple solution which I thought should work, restrict the flow at the throat before the outlet. Instead of adding regulating valves on each and every outlet which will attract and increase cost, I guess the simplest way to achieve this is to reduce the diameter at the throat by inserting a sleeves. Got hold of tubing of different diameters and cut short section of it to make sleeves. Inserted it into the throat of the outlet with the fastest flow rate and the result was encouraging. I had turned the flow regulator valve to feed the grow tank at the most minimal rate as possible in order to see the effect of the flow. 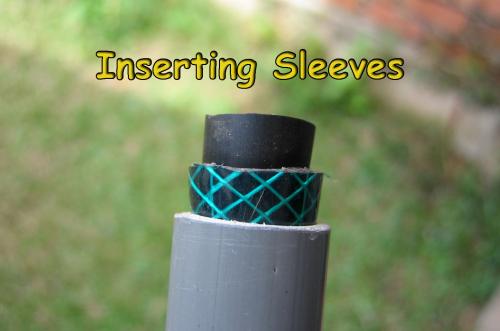
Sleeving ( photo / image / picture from KK Ng's Garden ) After lots of trial and error in establishing the diameter of each throat with all sorts of tubing and even plastic drinking straws, I managed to get the almost best even flow rate for all the 5 outlets. Once this is established, I can then adjust the cycle time . While adjusting the cycle time, I noticed that the drain did not stop and continue trickling at a steady pace. Oh no not another problem! Could it be the draining rate equals the feed rate? Checked the siphon hose one by one and confirmed that the two grow tanks that is the furthest away from the fish tank is the culprit. If the feed rate is equal to the drain rate then increasing the feed rate would solve the problem so I thought. Tried increasing the feed rate but problem is still there! 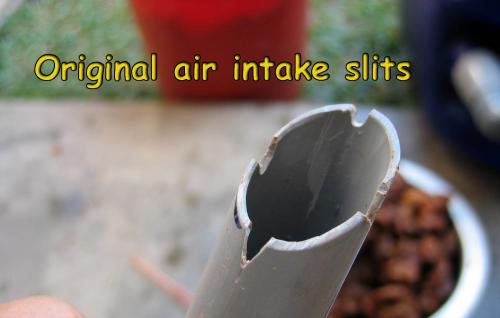
Version 1.0 ( photo / image / picture from KK Ng's Garden ) 
Version 1.1 ( photo / image / picture from KK Ng's Garden ) 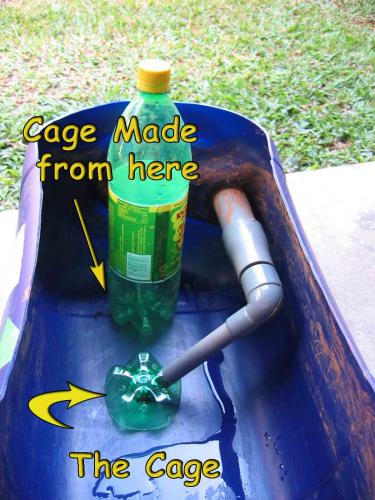
Insurance ( photo / image / picture from KK Ng's Garden ) It was getting late and decided to pack it in for the day and surfed the net till late at night looking for a solution but there was none. The next day I thought could be the air access hole being too small to break the siphon must be the problem and decided to make them bigger. It was a tedious task having to remove the pebbles from the two tanks but it was done after nearly 4 hours. Since I had all the pebbles removed from the tank, I decided to add a cage to the opening of the siphon tube to reduce the possibility of getting blocked in future. All the siphon system have the same size air access hole when I made them so I decided to redo the other three tanks as well. Even though it is tedious, if it must be done, it must be done - better safe than sorry or is it better now than later? Anyway cages were also installed as well to be on the safe side 
Pho bo - yummy ( photo / image / picture from KK Ng's Garden ) The next day got all the components and pebbles back in the grow tank and got the pump running again and ...... no, no...oh NO!!! it was still not working. Ah well, decided to help Becky with the very delicious "pho bo" or Vietnamese beef noodle soup preparation for lunch. This was the very first time we were making it and it was really yummy. After satisfying my tummy and rested, I headed to the aquaponic area to look at it again. Hmm ...... this maybe if I can just see what was happening under the pebbles maybe I would be able to find a solution. 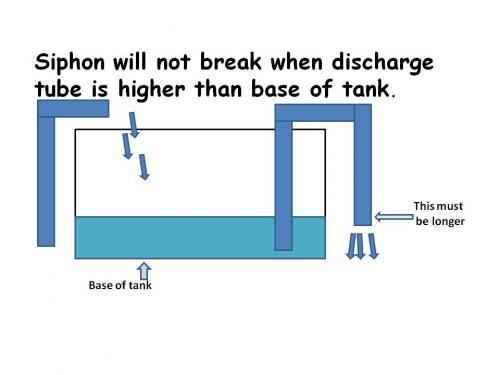
Siphon 5 ( photo / image / picture from KK Ng's Garden ) OK I decided just to make an opening in the pebbles until I can see the cage and observe the whole process from fill to siphon to break siphon to fill again. It was a long wait before the siphon started and again a very very long wait for the siphon to break because it did not. The siphon just slowed down when it reached a certain level and equal out to the feed, when I push the siphon loop lower the siphon speed increases. This must be the culprit, remove the hoses of the two problem tanks and compared them with the others and confirmed that they were shorter. Guess what, this problem was self inflicted, remember when some of the water was purging out during the very first run I cut the hose shorter to ease the flow, guess I cut a bit too much. Now to set the cycle time. This blog entry has been viewed 616 times
It's done ..... IS IT?
Category: Aquaponics | Posted: Thu Mar 10, 2011 3:18 pm Got the water pump which is the heart of the whole system which is reasonably priced and very reliable. Best of all the shop is just walking distance from my place. 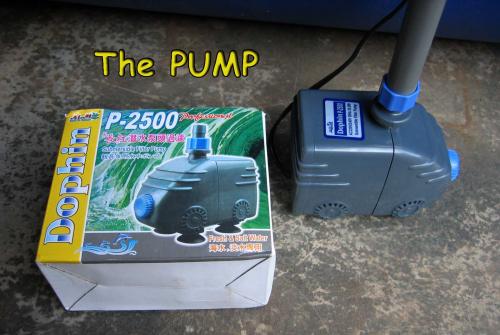
The Heart ( photo / image / picture from KK Ng's Garden ) It is a submersible pump exactly the same as the one that I have in my fountain which had been running continuously coming to three years now without any attention needed. It is rated 2,000 liters per hour with a power consumption of 28watts. Took a piece of left over 15mm pvc piping and it fitted nicely over the discharge port of the pump. With the diameter of the feed plumbing settled, I sat in front of the incomplete aquaponics system to imagine and decide on the best delivery system to feed the tanks with the water from the fish tank. Once decided, I started to make a shopping list for the hardware needed. From my measurement, I needed about 14feet of the rigid pvc piping but I decided to get a whole standard of 20 feet which is more cost effective than buying it base on foot run. 
Dry, dry, dry! ( photo / image / picture from KK Ng's Garden ) After getting the hardware together, I had to stop work for the day because it was getting late in the day and the plants in the mini farm need to be watered, no thanks to the extreme hot weather and dry spell. I have to water them 3 times a day for the moment. 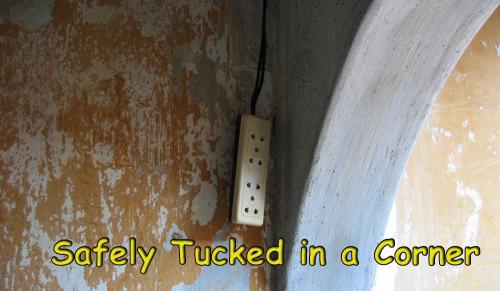
Power Point ( photo / image / picture from KK Ng's Garden ) Started immediately after breakfast the next day with the pump in hand and realised that the power was not done yet. Spent almost the whole day getting the cables and power point done up. The hardware were all left over from when I rewired the house. The wires were all new and the power was drawn from the main switch board with a dedicated mini circuit breaker. A switch is placed in the house for convenience of easy reach in case of emergency. 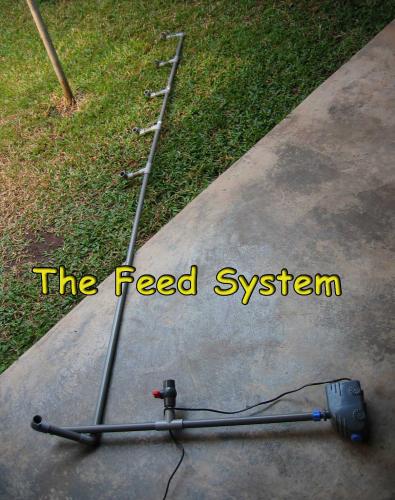
Feed ( photo / image / picture from KK Ng's Garden ) Basing on the principle that level of water will be the same if all vessels containing the water is connected, the feed pipe design is rather straight forward. The stopcock is to regulate the flow of the water. If the pump capacity is not enough, I had already convinced myself to buy another same pump if necessary because it did look a little small 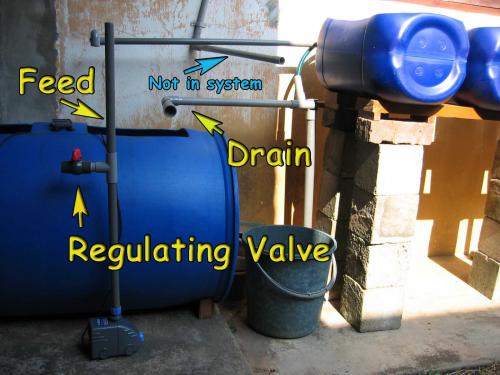
Feed System ( photo / image / picture from KK Ng's Garden ) Once everything was hooked up and ready to go, I decided to filled the fish tank with tap water because I had no more rain water and I don't think it'll rain soon. 
First Run ( photo / image / picture from KK Ng's Garden ) Once the tank was 50% filled and it was all system go! I was surprised the volume of the water that small pump can really pump up and in a matter of minutes the grow tank was filled and some even flooded before the siphon kick in. I was excited, really excited to see the system in motion. While adjusting the level of the flooded tank, I felt water splashing on my foot ......o..oh!! 
O, oh!! ( photo / image / picture from KK Ng's Garden ) 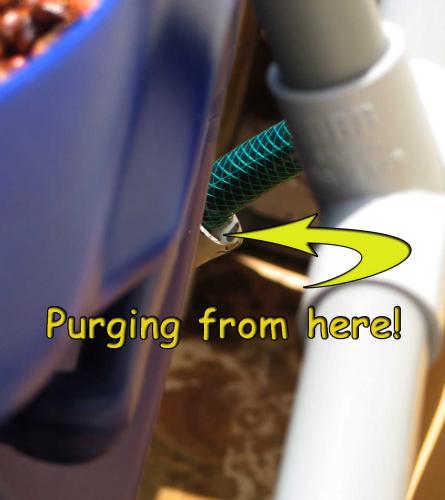
The Culprit ( photo / image / picture from KK Ng's Garden ) Made a quick inspection and found that water was splashing out of the hole where the hoses go into the drain pipe. Hmmm.... check the hoses where the water is splashing and concluded that they were too deep inside thus restricting the flow of the water and causing a back flow. Without another thought those hoses were reduced in lenght by about an inch or so and the problem was corrected. I am pleased that it was running and took a moment to admire it in action The flow regulating valve worked like a charm but I was wrong with the principle that level of water thingie, it only works base on arguhhh!!! I don't know!!! the flow to the five tanks were all at different rates. 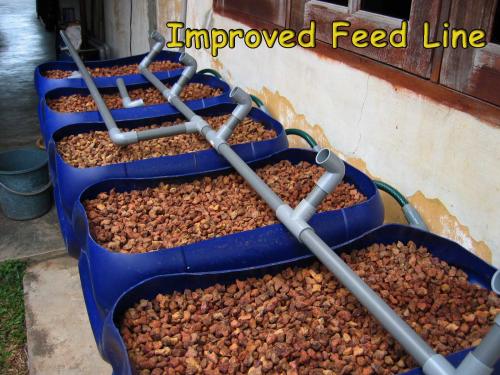
Feed Version 2 ( photo / image / picture from KK Ng's Garden ) Decided to change the design to this improved version with the main feed flow coming from more or less from the center. For this design I had added in the pressure from the pump and hope that the flow pressure would be distributed evenly through the outlets. Well it did not but at least I got even flow in pairs, that is the 2outlets at the ends were the same, the 2 mid-way have a flow rate of their own and the one closest where the feed is coming from was the strongest. Tried to find a solution but it was getting late and the mozzies were having a feast of me!! And the cost so far: 1 pc 200 litres Drum = $45.00 5 pcs 25 litres cans = $20.00 1 pc Funny Hand saw = $3.90 1 tube 300gm silicone sealant = $6.00 8 pcs Reduction Adapter 32 to 25mm = $5.60 8 pcs Reduction Elbow 25 to 15mm = $4.80 1 meter 32mm pvc thin wall pipe = $2.50 1 meter 15mm pvc thin wall pipe = $1.50 1 pc best quality hacksaw blade = $3.80 4 pcs 20mm pvc T junction = $3.80 1 roll teflon tape = $0.50 1 pc submesible pump = $48.00 5 pcs pvc 15mm T joint = $5.00 1 pc 20ft 15mm pvc pipe = $10.50 1 pc 15mm pvc/nylon stopcock = $8.50 7 pcs 15mm pvc elbow = $5.60 Last edited: Thu Mar 10, 2011 3:23 pm This blog entry has been viewed 608 times
Almost There!
Category: Aquaponics | Posted: Wed Mar 02, 2011 3:44 pm Done with the sorting of the pebbles and assembly of all the grow tanks with the drainage plumbing in place. The sorting of the pebbles was rather boring but it must be done. In total I made 3 trips to pebble land and spent more than 10 hours doing the sorting. Good things doesn't come easy in life ya!! The first batch of the pebbles was filled into the prototype tank to make sure that it would work fine and it did. 
Pebbles ( photo / image / picture from KK Ng's Garden ) The pebbles were filled in the order of the coarse right at the bottom to small at the top. 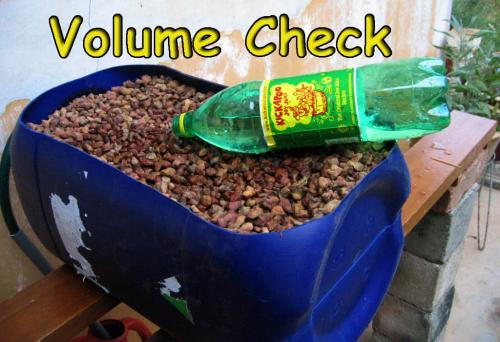
Water Capacity ( photo / image / picture from KK Ng's Garden ) The amount of water that was being held in the grow tank before the siphon start was also determined after the pebbles were in. It is about 11 liters and with 5 grow tanks a total of 55 liters of ............ oops!! mental mathematics block!! Will look at this matter when I can do a full physical run to see how would the whole system perform. 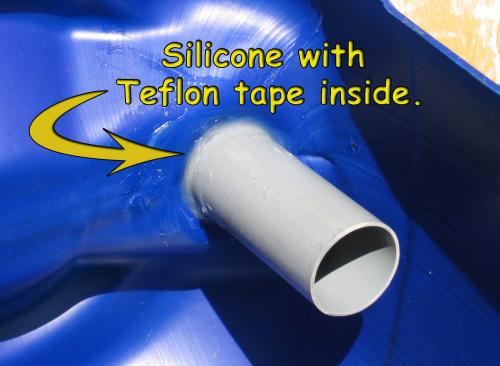
Sealing ( photo / image / picture from KK Ng's Garden ) All the other grow tanks did not have a perfect fit for the drain pipes as in the prototype. This time I have to use silicone together with teflon tape (thanks for this suggestion Sojerd). The teflon tape is great for increasing the perimeter of the piping for a snug fit while the silicone provided a great seal. While doing the assembly, a thought came into my mind that nasty algae will grow in the transparent soft pvc tubing that forms part of the siphon loop. I decided to make use of opaque flexible hose instead of the transparent pvc tubing 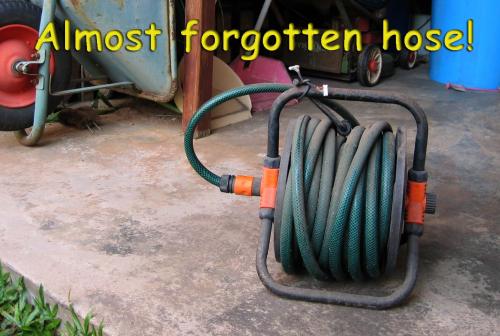
Opaque Hose ( photo / image / picture from KK Ng's Garden ) Once again up into the goodies store to look for an alternative and all I could find is this extra long garden hose that had been comfortably rolled up in its reel. It was all dusty for being up there for like ages and I guess cutting a couple of feet won't hurt. 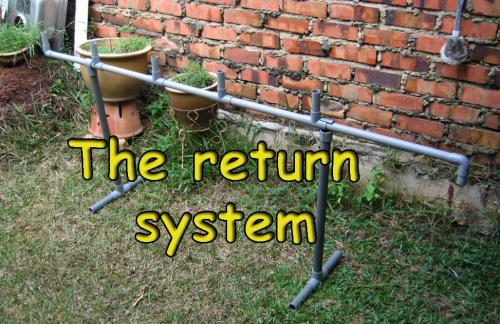
The Return System ( photo / image / picture from KK Ng's Garden ) The pebbles went into the grow tanks as they were sorted until all were filled before the plumbing work was started on. I had the return plumbing firmly embedded in my mind and was really excited to see it transformed into reality piece by piece. For the stand, I salvaged the materials from one my funny fishing gadget which was some kind mini sailing vessel. 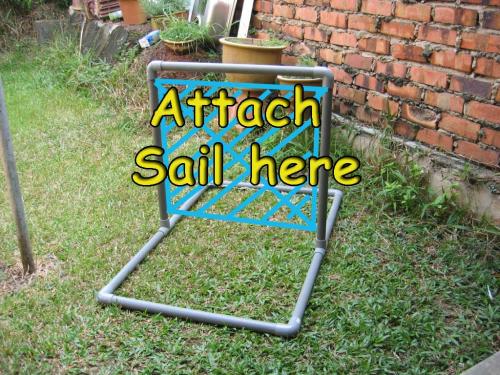
Fishing Contraption ( photo / image / picture from KK Ng's Garden ) I made this contraption after reading about it in the internet and did not catch any fish with it. The idea is for it to carry the hook and baits away from the beach as far as possible which I thought there were many fishes but ........ ah well!! that was history. Some of the parts were salvaged from the rod holder. The 20mm rigid pvc piping that I am using had a little story of its own. Never knew that the pressure could caused the pipe to crack, it was really messy and ugly. 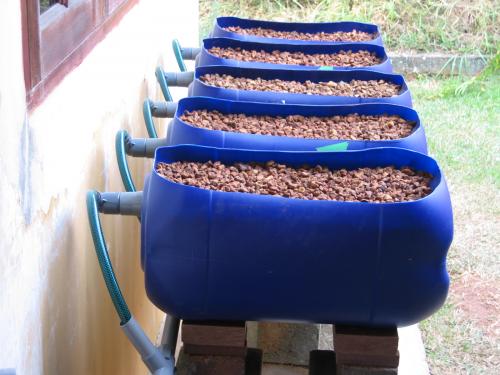
All in a row. ( photo / image / picture from KK Ng's Garden ) 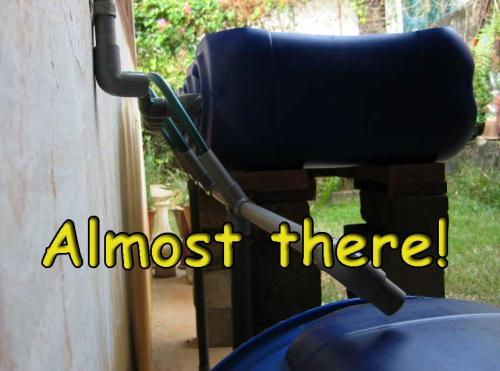
Almost there! ( photo / image / picture from KK Ng's Garden ) Now I am glad that I got a use for it and it should not cause any unexpected mess. Anyway the only expenses here were the T-junctions and teflon tape. And the cost so far: 1 pc 200 litres Drum = $45.00 5 pcs 25 litres cans = $20.00 1 pc Funny Hand saw = $3.90 1 tube 300gm silicone sealant = $6.00 8 pcs Reduction Adapter 32 to 25mm = $5.60 8 pcs Reduction Elbow 25 to 15mm = $4.80 1 meter 32mm pvc thin wall pipe = $2.50 1 meter 15mm pvc thin wall pipe = $1.50 1 pc best quality hacksaw blade = $3.80 4 pcs 20mm pvc T junction = $3.80 1 roll teflon tape = $0.50 This blog entry has been viewed 623 times
Sorting
Category: Aquaponics | Posted: Wed Feb 23, 2011 3:56 pm 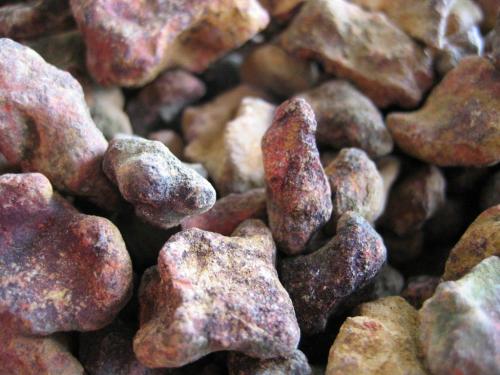
Pebbles ( photo / image / picture from KK Ng's Garden ) Been busy sorting out the pebbles into three different sizes - coarse, medium and small. Need to do this because I want the largest of the stones to be right at the bottom, then the mid-size and finally the small. I wanted this because it will act like a filter and passage of the water right at the bottom would not have restriction. 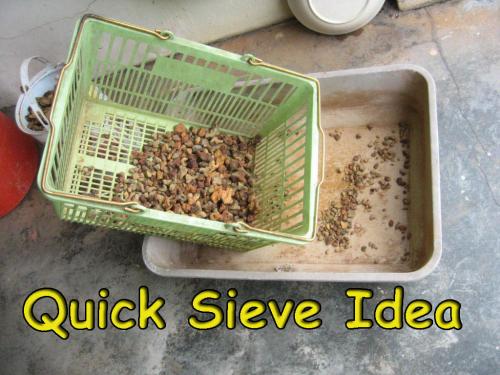
Quick Fix ( photo / image / picture from KK Ng's Garden ) The first stage is to pick out those that were larger than 4cm in size. The next size was between 2~4cm which I thought the old shopping basket would be a good candidate because of the varied size gaps on it. I was wrong because it was really difficult to make use of the 4cm gap. 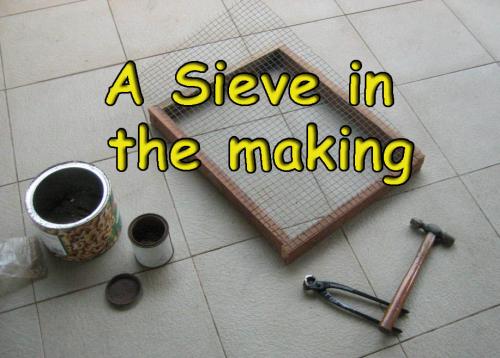
Sieve ( photo / image / picture from KK Ng's Garden ) After much suffering of trying to sieve the pebbles with a basket, I decided to make a proper sieve. After looking around here and there, I was lucky to find some old fencing that I used when I was romancing the romaine. The wooden frame was from part of the old bed that I found. 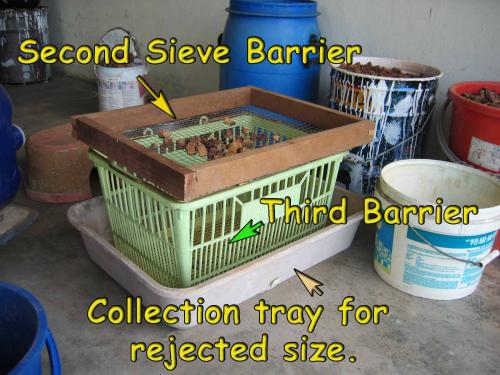
Systematic ( photo / image / picture from KK Ng's Garden ) With the proper sieve in place, sorting was much more pleasant. For those that were less than 1cm were used to fill up holes along the fence. Getting closer!! This blog entry has been viewed 628 times
Pebble Land
Category: Aquaponics | Posted: Sat Feb 19, 2011 3:26 pm After taking a survey around my yard, keeping in mind that the growing media must be easy draining, easy for the roots to anchor and neutral ph I guess. 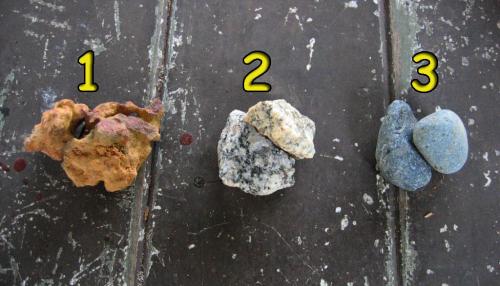
Grow Media Choices ( photo / image / picture from KK Ng's Garden ) The first one 1 is Laterite which is the most abundant around and it is free. Number 2 is Granite which was left over from the time I had the house renovated when I bought it. If I want to use it I guess I had to buy it. Number 3 is River pebbles, nice to see, nice to feel but it's expensive. I had some left over when I made my pond a couple of years ago. 
Pebble Land ( photo / image / picture from KK Ng's Garden ) Yes, laterite is the best choice for me and I know excatly where I can tons of it for free. Pebble land here I come! 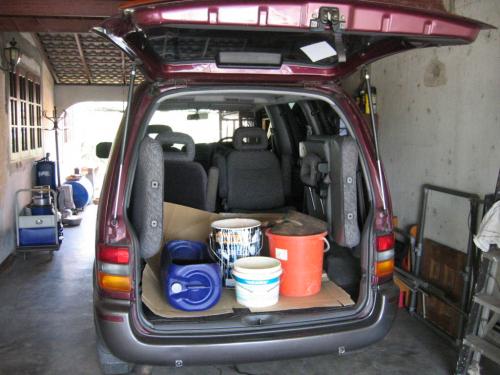
Ready to go! ( photo / image / picture from KK Ng's Garden ) I can get it in my yard but I do not want to leave a big hole in it, so with the necessary tools in my faithful Chariot I headed out to pebble land. It is just round the corner from my house. The weather was really hot and the sun was scorching when I arrived there. After circling around awhile I parked at a spot that I thought where the peebles look nicer. Got down and walk around for awhile to further inspect what peeble land had to offer. 
Rest Area! ( photo / image / picture from KK Ng's Garden ) It was really burning hot and I quickly headed back to my Chariot to shield myself from the sun. While shielded from the sun, I thought to myself that all the pebbles here are same and they were everywhere. Took out the shovel and wanted to gather the peebles that were shaded by the Chariot. Berfore I can start the sun was covered by passing clouds and I quickly decided that the pebbles over there looks nicer and straight away I headed there with the shovel to gather as much as I can before the sun reappear. Strange indeed, the grass always look greener on the other side. This blog entry has been viewed 818 times
LUCKY DAY!!
Category: Aquaponics | Posted: Thu Feb 17, 2011 2:11 pm After having all the components for the grow tank ready to be assembled, I did not proceed to assembling them. 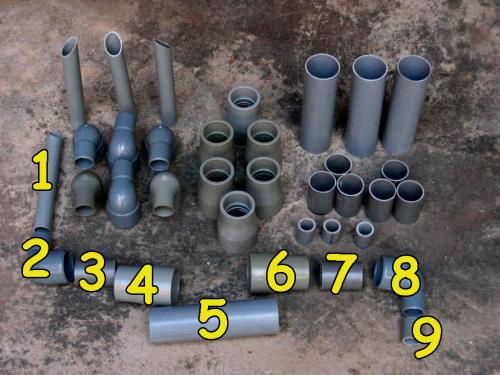
Components ( photo / image / picture from KK Ng's Garden ) The components from 1 to 4 is inside the grow tank and 5 is the connector to the outside connecting 6 to 9. The flexible tube is connected to 9 which has a smaller internal diameter than 9. This is necessary in order to bring about the Venturi effect thus starting the siphon. I did not proceed with the assembling because I was wondering what I should make use of in making the stand for the grow tanks, I can't have them on the floor because the return depends on gravity. I need to get the stand up also to visualise how the feed and drain plumping should be done. Checked my stash of lumbers but none were suitable so ........... for the last two days whenever I went out, I would keep an eye out for any discarded timber in any form which I could make use of. I was really reluctant to go to the timber yard to just buy a couple of foot run of the beams I needed because they would charge a exorbitant price for the transport or I had to wait at least a couple of days before they are delivered. So that was my last choice. Yesterday was my lucky day, while delivering some groceries to my mum-in-law's place, I saw what looks like a pile of discarded bed frame in the rubbish dump of a school which is just about 30yards from her place. I was delighted to see the lumber of the bed frame is still in great condition and on closer inspection, one of the legs had broken off. 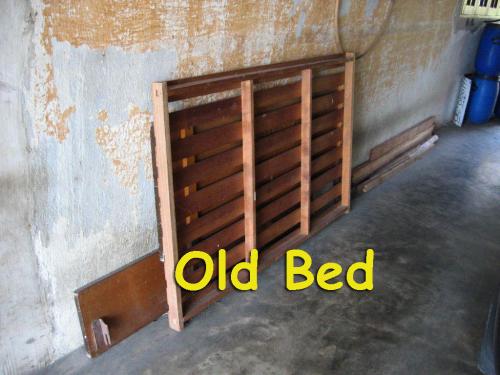
Old Bed ( photo / image / picture from KK Ng's Garden ) Piece by piece I took it to Becky's mum place for safe keeping because I had to return home to get the Old Chariot to transport my precious find. Becky's mum was surprised to see me taking the old bed frame into her compound because she just got someone to throw it out earlier. Looks like it is just a simple case of one person's rubbish is another person's treasure! 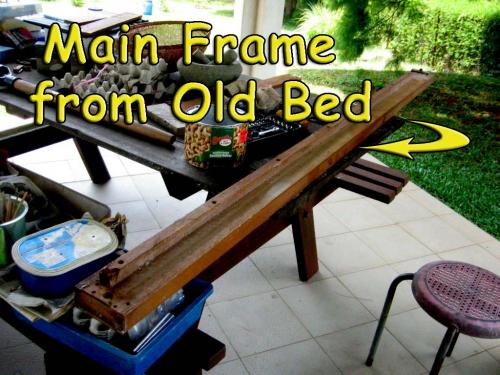
Recycling ( photo / image / picture from KK Ng's Garden ) This morning after having removed the unnecessary parts from the main frame of the bed and having it sawn to the required length, I was able to setup the layout of the system. Having anticipated the weight the racking had to bear, I decided to make use of the concrete blocks for the pillars and the wooden beams as the cross-member. I have no idea what the concrete blocks were for but every piece have a date on it and where they came from. They were left here by the previous occupant of the house I think. 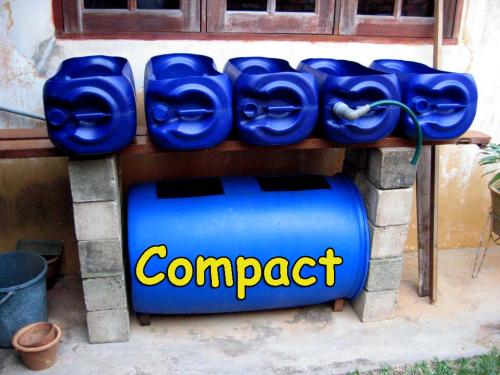
Compact Layout ( photo / image / picture from KK Ng's Garden ) The compact layout was my first thought but it did not look stable enough. Not having a center support for the cross-member also worried me because furniture wood is not exactly very strong. 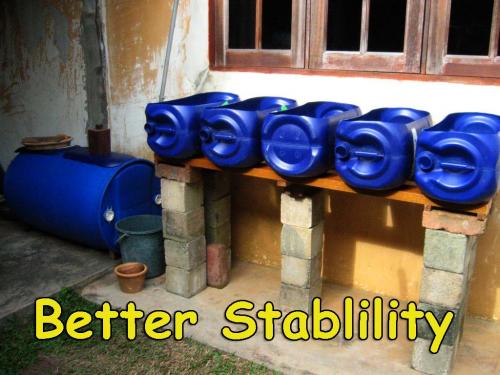
Acceptable Layout ( photo / image / picture from KK Ng's Garden ) This layout is much more stable and it is easier to work with the fish tank if need be. Since I have the space, I guess I'll stick with this layout. Cost of grow tank stand - $0.00 Next - GROW MEDIA This blog entry has been viewed 587 times
Shopping!
Category: Aquaponics | Posted: Fri Feb 11, 2011 3:16 pm This morning I finished opening up the last tank for the grow bed. 
The Grow Tank ( photo / image / picture from KK Ng's Garden ) Guess what, my old quality hacksaw blade is still in one piece and is still ready to go on to the next sawing task! When come to hacksaw blades the best is a must or there'll definitely be lots of set back and frustration. 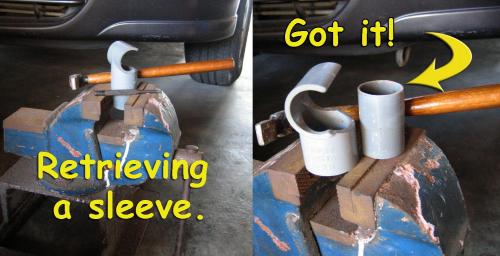
Retrieving Parts ( photo / image / picture from KK Ng's Garden ) Having done the grow tanks I started retrieving as much parts as I can to be reused. 
Garage Attic ( photo / image / picture from KK Ng's Garden ) The next place to check out is the garage attic where many things were stashed away and forgotten. Sometimes it is just a frustration when looking for something that isn't there but today it is a treasure chest for me cause there were some pvc pipes that I can use. 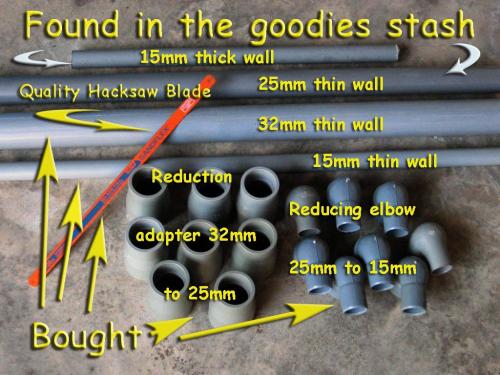
The Hardwares ( photo / image / picture from KK Ng's Garden ) Next is the shopping trip itself and I went to the largest plumbing hardware store in Malacca. I was disappointed that they do not carry the 32mm to 15mm elbow. According to them that is a rather a odd size and they don't think anyone manufacture it. If they don't have I guess it is pointless to go else where to look for it. Guess I had to stick with what I had done and make use of additional reduction adapter 32mm to 25mm. Next I guess would be the assembly and layout. OK the cost so far: 1 pc 200 litres Drum = $45.00 5 pcs 25 litres cans = $20.00 1 pc Funny Hand saw = $3.90 1 tube 300gm silicone sealant = $6.00 8 pcs Reduction Adapter 32 to 25mm = $5.60 8 pcs Reduction Elbow 25 to 15mm = $4.80 1 meter 32mm pvc thin wall pipe = $2.50 1 meter 15mm pvc thin wall pipe = $1.50 1 pc best quality hacksaw blade = $3.80 Last edited: Fri Feb 11, 2011 3:31 pm This blog entry has been viewed 741 times
Itching
Category: Aquaponics | Posted: Tue Feb 08, 2011 3:45 pm Last Sunday I was really itching to setup the grow bed to check whether it is possible to make use of the exsisting hole or not even though I am not sure I have the hardwares or not. After sending the children to the bus station for their return to their respective college/university, I decided to just cut open one of the drums for the grow bed to see how it is. 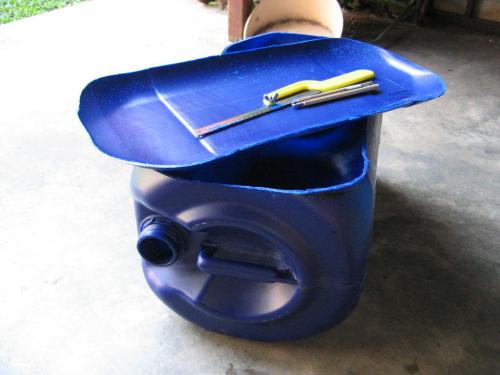
Grow Bed ( photo / image / picture from KK Ng's Garden ) Got the drum opened as plan and it was quite easy after getting some experience opening the big drum for the fish tank. Incidentally, the 2 pieces of hack saw broke while I was cutting the fish tank, they were really brittle and snap real easy. I took the blade from my hack saw and used it ..... have to make a note to get another for spare. After having done that, there was about another two hours to dinner and not wanting to do weeding, I started going through my old stuffs to look for pipe fitting. I guess the itching was too great to be supressed. After digging around for awhile, I found my old surf-casting fishing rod holder which I made from pipe fittings and broom handle. Since I had not gone fishing for a very long while now I decided to dismantle it and make use of the parts together with whatever left over pvc pipes and fittings I had collected over the years from my house maintenance. 
Perfect ( photo / image / picture from KK Ng's Garden ) Luck was with me cause there was a short section of the 42mm dia. pipe, cut of the broken end and got a lenght that should be ideal. The fit was perfect, I have to tap it in quite a bit. 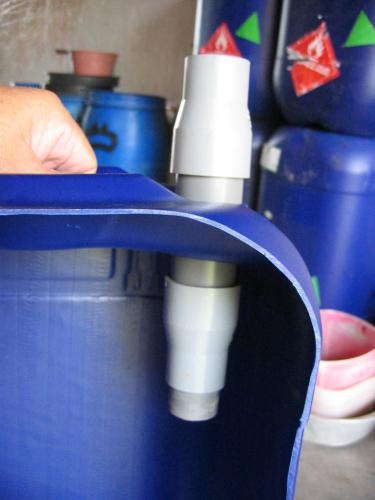
Fitted with reduction adapter ( photo / image / picture from KK Ng's Garden ) I did not have reduction elbow of the right size so I have to make use of reduction joint before the reduction elbow. 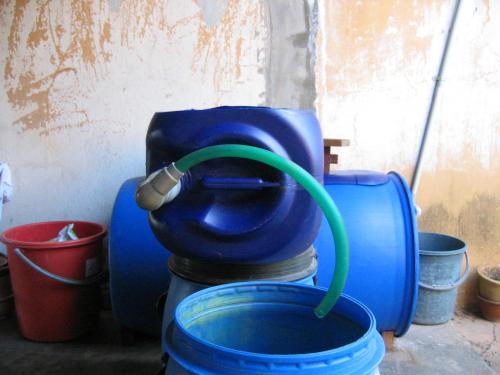
Unexpected design ( photo / image / picture from KK Ng's Garden ) I tried making use of the design that I thought of earlier but was unable to do so cause it was either unworkable or there was not enough hardware. I decided to do a quick fix and make use of a section of my old PVC flexible hose. 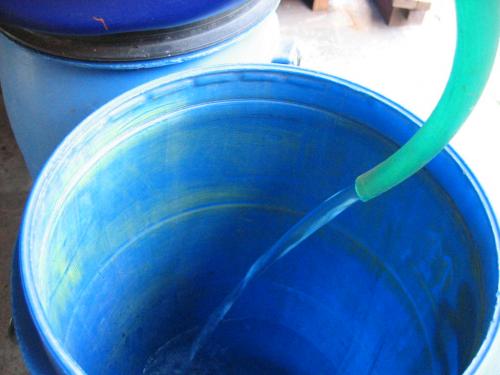
It Worked!!!!!! ( photo / image / picture from KK Ng's Garden ) HEY!!! IT WORKED!!! Not only it worked, it worked real well. I guess making use of flexible hose would be more flexible for me to set up the reurn piping. 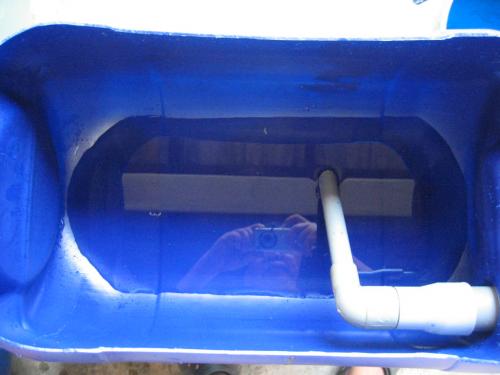
Inside setup ( photo / image / picture from KK Ng's Garden ) This is the remaining water from the backwash when the siphon was broken. I guess it is a acceptable amount of water left over. Now to make a shopping list to get all the grow beds fitted so that I can get on with setting up the water feed and return piping. This blog entry has been viewed 2089 times
You're reading one of many blogs on GardenStew.com.
Register for free and start your own blog today. |
|
